Maintaining a blog does not only refer to maintaining the content and the backend updates but also is about securing your blog so that it stays protected from any untoward act of phising or hacking attempt. And if you think since your blog does not need much security since it is small in terms of stats or popularity, you are wrong. If any vulnerability is spotted by a hacker on your blog, there are good chances of it being hacked.
Here I will try to discuss almost all possible ways of securing your wordpress blog by two main approaches – Without using plugins here and by using plugins in Part 2.
Securing WordPress without plugins
Listed below are methods to enhance security of your blog without use of any plugin:
- Separate Blog and WordPress Directory – You can separate the wordpress and blog directory in two ways. You can either input the separate urls Admin>>Settings>>General or use wp-config.php to define the two urls. Second approach can be used for troubleshooting purposes when you can’t access Admin Dasboard. In such case make sure that wordpress url is something encrypted. Such config is also useful when you upload default zip file from wordpress.org where wordpress is located in a subdirectory. Also make sure that this will work only if index.php from wordpress root install is copied to the blog url directory. And edit the pathname in the file accordingly in index.php. E.g. if your wordpress is in /home/public_html/domain/wordpress7472/ (http://domain.com/wordpress7472) and blog is at /home/public_html/domain/ (http://domain.com), then the index.php at /home/public_html/domain/ should look like the following:Comments removed from original index.php as they are not required. Pathname in index.php should be relative to the directory where it resides currently.
- Change Default Username – This is the most basic of methods which will definitely help you from few type of attacks which are targetted primarily because wordpress provides default username at first install. To change the username, you need to perform a sql query or directly edit the entry if you are using phpmyadmin. Here is the sql command to change the username:If you are not comfortable running a sql query or editing databases, create a new admin user and delete the old one.
- Changing Database prefix – WordPress uses the default prefix for its tables which is wp_ which can be easily targetted as anybody would know the table name directly without guessing. Changing this prefix helps a lot to prevent from random SQL attacks. If you are yet to install WordPress, this prefix can be changed during the installing procedure where the installer asks for the prefix.Changing the prefix on a working blog takes a bit more work. Listed below are the steps required to change the wordpress table prefix:
- Open the file wp-config.php in your wordpress root directory and find the following line:Newprefix can contain any letter, number or underscore but it should not start with a number. You can use wp_webhost125_ or wpwebhost125_ as your newprefix too.
- Rename all tables in your SQL Database with the newname. You can use the following sql query to achieve this:
You will have to repeat the same query for all tables.
- Changing the table names does not complete the job. There are still some option names using default table prefixes which need to be updated manually. Under the table newprefix_options, find the option named ‘wp_user_roles’ and rename the option name to ‘newprefix_user_roles’. There is no general sql query for doing this because option id of this option name can be different on different blogs.Under the table, newprefix_usermeta, options to be renamed are: ‘wp_capabilities’, ‘wp_user_level’ and ‘wp_autosave_draft_ids’. Last option name will exist only if you have saved some of the draft posts earlier.
Now the new table prefix should start working as required.
- Remove WP Version Information – WordPress generally gives away the version number of your installation at 2 places – in the site’s header and the footer(if the theme displays it). If you are using a older version of WordPress, you should remove it lest it gives hackers information that you are using outdated version which may have some security loopholes in it for them to exploit.Removing information from the footer is easy…just find the php code in your footer.php and delete it. For removing it from your header, it requires you to edit the theme’s functions.php file since it is displayed automatically in header by wp_head() function call from header.php file. Add this line to your theme’s function.php just before the last ?> :Above method of editing functions.php works only in WordPress 2.5 and above. For wordpress versions below, it remove this code from theme’s header.php file:This code may appear in your themes if you are using them in WordPress 2.5 or above, as some theme authors may not have removed this.
- Disable Remote Publishing if you do not use it – If you are not using any external tools to publish to your blog like Windows Live Writer then you should disable remote publishing. Go to Admin>>Settings>>Writing and uncheck both options mentioned under Remote Publishing: Atom Publishing Protocol and XML-RPC. For the complete disable of remote publishing, add the following lines in your theme’s function.php just before the last ?>:First line removes the link which disables Posting from Windows Live Writer. BTW, adding the rsd_link line will disable pingbacks and trackbacks from working on your blog apart from disabling Remote Publishing. If you need them, don’t add the second line.
- Hide your plugins and themes – You don’t want people to know about the themes and plugins used by you. To do that, just visit wp-content/plugins/ and wp-content/themes/ under your blog’s url and upload a empty index.html file into these directories.
- wp-config.php hacks: Following is the list of hacks related to the file wp-config.php.
Note: All codes which need to be inserted into wp-config.php should be before the line which says stop editing. This is very important for any hack to work properly- Protect wp-config.php file – This file is very important as it contains the username and password of the database on which your blog is hosted. Add the following code in .htaccess file in your blog’s root directory:
- Update/Add Security Keys in wp-config.php – Since WordPress 2.6, there are some security keys added to wp-config.php which enhances the security of your WordPress installation as they help to encrypt the cookie information stored by your blog. If you don’t have them or want to change them, visit WordPress.org Secret Key Service to generate random keys and paste the generated code in wp-config.php as it is just before the sentence which says stop editing or replace the existing keys.
- Move wp-config.php file – WordPress 2.6+ allows you to move your file out of your wordpress install directory. If your blog is in root directory, best way is to move wp-config.php upto one level higher. For example if your blog is at http://www.domain.com (home/public_html/domain/) then wp-config.php can be kept at home/public_html/ without need of any configuration. This feature is supported by WordPress 2.6+. And if you are using WordPress 2.5 or lower or using wordpress a subdirectory, process of moving the file is different which is mentioned below:
-
- Open the current wp-config.php and copy the portion which contains Database information and authentication keys of wordpress. Now go to the directory where you want to shift the wp-config.php file, create a new file in that folder named something as config.php and paste the earlier copied information. Your wp-config.php should like something as:I have removed the comments from the php file as they are not needed and inflating this tutorial unnecessarily too.
- Now instead of above code in wp-config.php, paste the following line in your wp-config.php and save the file.
In effect instead of moving the complete file, you have moved the sensitive portion of wp-config.php which is now at unaccessible location.(home/public_html/ is always unaccessible – you can copy to any such location if this is not your webhosting’s case)
-
- Use SSL for Login/Admin – If you have purchased SSL Certificates for your domain, then you can enable SSL connection for your WordPress login and admin channel by embedding the following code into your wp-config.php:For more information about SSL on WordPress, read WordPress Codex Article.
- Htaccess file hacks: Following is the list of hacks performed to .htaccess file for securing WordPress:
- Protect wp-admin directory – You can block all IPs from accessing wp-admin directory except your IP address. Add the following code to your .htaccess file:where xx.xx.xx.xx is your IP address.
- Protect Public Browsing of All Directories – Dropping index.html file protects only plugins and themes directories and its not practical to drop index.html in every other directory. A better way is to insert the following code in .htaccess file:
- Deny comment posting to no referrer requests – Most spammers are bots which post comments to your blog without even accessing or opening your blog and open the file wp-post-comments.php directly without sending any referrer information. The following code if inserted into .htaccess file blocks such bot spammers:Replace yourblog.com with your blog’s domain.
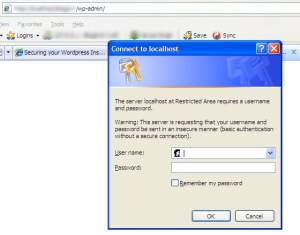
- .htaccess authentication for WordPress Admin – This method will add one more username/password authentication for your WordPress Admin Dashboard. Steps to achieve this are listed below:
- Visit Dynamic Drive’s .htaccess Password Generator and fill out the username, password and a path which is inaccessible by anybody (e.g /home/public_html/ )
- Copy the code provided for .htaccess into your blog’s wp-admin .htaccess file(create if not created)
- Copy the code for .htpasswd file into .htpasswd file into the path provided above ( /home/public_html/.htpasswd )
Now your WordPress Admin Should be password protected twice!
- Use Shell/SSH instead of FTP – SSH/Shell access is much more secure for transferring files than FTP. Use it if your webhosting allows it.
- Block WordPress folders from Search Engines – You should block your wordpress folders from being accessed by search engines by inserting the following line in your robots.txt file in your blog’s root directory:
- Suppress Error Message on Log-In Page – When your login to wp-login.php fails, WordPress always tells you whether the username is wrong or password is. This may be useful for you but is also very useful to a person who is trying to brute attack into your blog. You can suppress this message by inserting the following code just before the last ?> in your theme’s functions.php file:
- Change File Permission – Check your file and folder permissions. For wp-config.php, set the file permission as 644. For directories, set the permission as 755 and files as 644.
- Choose a strong Password for Admin – Choose a password which should contain random alphabets, numbers and special characters which makes it tough to crack. You can use a Password generator tool for it too.
- Make Daily Backups of your Database – You should keep a daily backup of your blog’s database. Use WP-DBManager Plugin to have the database emailed you daily.
- Keep Your Blog, Plugins and Themes Updated – Always try to maintain updated versions of your blog, plugins and even the theme.


