Do you want to add Q&A section in your WordPress website that is fully integrated with WordPress user management system and database? With this method, your Q&A section and your WordPress website share the same database and user-management system.
In this beginner tutorial, you will be using “Question2Answer” which is an open source Q&A platform that can provide similar functionality to top question and answer websites like StackOverflow. This tutorial will illustrate the complete steps of integrating this Q&A platform to your existing WordPress website. This also assumes you are installing WordPress in the root directory of your domain.
The integration is actually very simple; just follow the steps below:
Preparatory Steps before Uploading Question2Answer
1.) Download the latest Question2Answer version to your Desktop and extract it.
2.) First, you need to know the WordPress path in your server. To do this, open a notepad or any text editor, then copy and paste the code below:
<?php
echo $_SERVER['SCRIPT_FILENAME'];
?>
Then save it as absolutepath.php
3.) Upload this script to your WordPress root directory (the same path where wp-load.php is found).
4.) Finally access this script using a web browser. Since you have installed WordPress in the root directory of your domain; you can enter this URL in the browser and press enter to get the path:
http://www.example.com/absolutepath.php
Or if you are using a sub-domain which is using WordPress in its root directory, you can run absolutepath.php like this:
http://subdomain.example.com/absolutepath.php
It should return this result in the browser such as:
/home/phpdevel/public_html/absolutepath.php
Remove the absolutepath.php from the above result, and then the remaining is your WordPress path. For example, this is the WordPress path based on the above result:
/home/phpdevel/public_html/
Take note of this path.
5.) Go to the extracted “Question2Answer” folder and find qa-config-example.php.
6.) Open qa-config-example.php and find this line:
define('QA_WORDPRESS_INTEGRATE_PATH', '/PATH/TO/WORDPRESS');
By default this is commented in PHP so you need to uncomment this line. Then replace:
'/PATH/TO/WORDPRESS'
With your WordPress path as determined in the previous steps:
define('QA_WORDPRESS_INTEGRATE_PATH', '/home/phpdevel/public_html/');
This is how it looks like after doing these changes, take note that the line is now uncommented:

Then save it as qa-config.php. You can now safely delete qa-config-example.php.
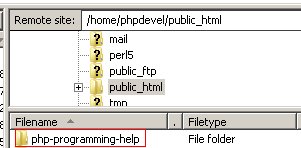
7.) Login to your server using an SSH client (recommended than using FTP because of security) and create a folder at the root directory of your WordPress website. Assign a good name to your WordPress Q&A section that makes it easy for your visitors to understand and make it SEO friendly. For example, if you are running a PHP programming website and would like your readers to ask a question, you can name the folder as: “php-programming-help”. See the screenshot below showing this created folder at the root directory of your WordPress website:
8.) Using an SSH Client such as Filezilla, right click on the created folder and click “File permissions”. Assign a file permission of 755 to this folder.
Uploading and Installation of Question2Answer
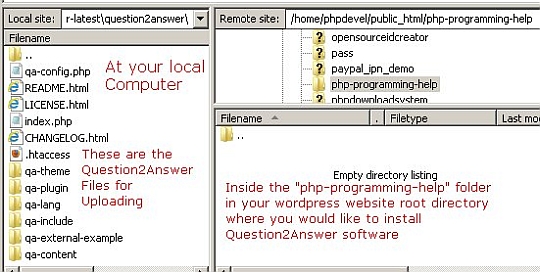
9.) It is time to upload Questions2Answer to your WordPress website. Using an SSH client; connect to your server and go inside the created folder for Question2Answer files (e.g. “php-programming-help” in the above example). This is how it looks with Filezilla GUI:
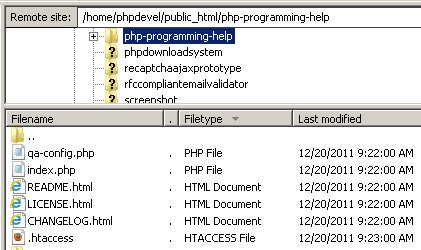
10.) Upload all the files and folders of the Question2Answer core files including the qa-config.php, .htaccess, etc. It can take some time, wait until all files are completely uploaded and then you can see it like this one below:
11.) Launch a web browser and then enter the Question2Answer URL to install the software. If your Q&A folder is named as QA; then the path to enter would be:
http://www.example.com/qa/
In the previous example on setting a php programing help section on your WordPress website, this is the URL to enter in the browser address bar:
http://www.example.com/php-programming-help/
12.) The first thing you would see is that Question2Answer will ask you to set up the database. Click the “Create Database” button.
13.) If you see the message “Your Question2Answer database has been created and integrated with your WordPress site.” click “Go to Admin Center” then login as an administrator.
14.) Since Question2Answer is now integrated with WordPress database, login using your WordPress administrator credentials. Bear in mind that if you click the login link, it would be redirected to your WordPress login page.
15.) Finally after successful authentication, you should be able to see the Question2Answer:
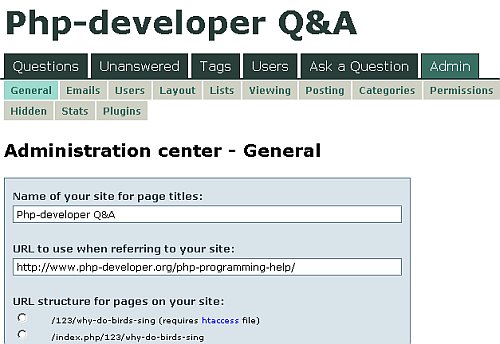
The quickest admin configuration you could do is to set for user/SEO friendly URLs in your Q&A site integrated with WordPress which is supported since you are using htaccess. The rest are easy and simple. For configuration details and editing of your Q&A templates; you can go to the official website: for related documentation.
You can further secure your Q&A site by reading some tips here. Now if a user registers your site, it will automatically be managed by WordPress and all questions and answers would be saved in the same database used by WordPress.
