This is a complete step by step procedure for WordPress beginners on how to integrate an Oauth 2.0 compliant Facebook comments in your WordPress blog. Oauth 2.0 is the open standard for authorization and authentication adopted by Facebook beginning in 2011.
It is highly recommended to use this protocol when implementing Facebook comments in your WordPress blog.
The Complete Steps
Step1.) Go to Facebook developer page. You need to login using your standard/verified Facebook account.
Step2.) Click “Apps”.
Step3.) Click “Create New App”.
Step4.) You only need to assign a name of your apps. For example see below; it will also confirm whether it is valid or not:
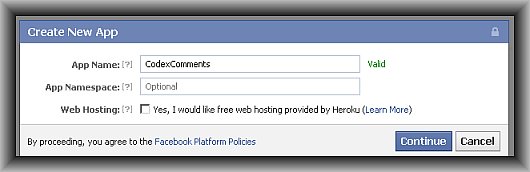
Note: You do not need to enter any information on the App Namespace or click Web hosting options.
Click “Continue”. Facebook Apps would then provide you an Application ID, App Secret, etc. Make a backup of this by copying these values to blank text file and saving safely to your computer. In the succeeding steps make sure you are still logged in at Facebook. Do not yet logout.
Step5.) Measure the width of your WordPress blog post where you would like to include Facebook comments. Too much width can distort your existing template. Too little width would make it difficult for users to enter their comments.
You need to measure the width using Firebug, an add-on from Firefox.
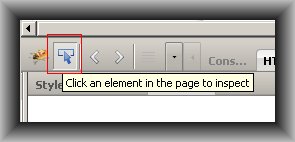
Install Firebug then restart the browser. Go to any of your WordPress blog post. Measure the width of your existing comment area by right-clicking on it and click “Inspect element with Firebug”. And make sure you “click an element in the page to inspect”, see screenshot:
Then click “Layout” tab in your Firebug options. This is how it looks like:

The comment area is around 696 pixels in width as shown by Firebug layout. The comment area is enclosed by blue lines when selected/inspected by Firebug.
Step6.). Go to this Facebook comment configuration page.
You need to define 4 things:
a.) URL to comment on = set this to your domain homepage, e.g. http://www.php-developer.org/
b.) Number of posts = leave it at 2.
c.) Width = this is the width you have measured in step5.
d.) Color Scheme = if your website has a dark background, you need to select dark, otherwise select white.
For example, see screenshot below:
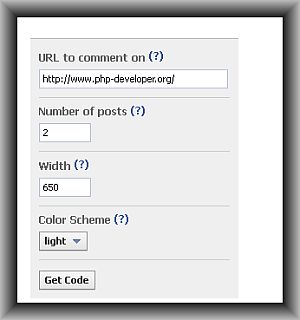
Make sure that the width is less than your comment area width. For example, since the actual width is 696 pixels, the actual Facebook width is selected at 650 pixels. You can change this at anytime.
Click “Get Code”. There are two codes, the first one is the JavaScript SDK and the second is the actual Facebook comment code. Copy these codes to blank text file (notepad). Save it to your desktop. Take note that these Facebook comment codes now includes your Application ID.
Step7.) Download your footer.php template (from your active/currently used WordPress theme files). As a rule in fast website loading, all JavaScript (including Facebook JavaScript SDK) should be added at the footer section of your WordPress blog.
Open footer.php in notepad or any code editor. Paste the JavaScript SDK code just before </body>, see screenshot below:

Save the changes.
Step8.) Modify your Facebook comment code data-href parameter to work with all of your WordPress post. Change it from:
<div class="fb-comments" data-href="http://www.example.com/" data-num-posts="2" data-width="690"></div>
To:
<div class="fb-comments" data-href="<?php the_permalink(); ?>" data-num-posts="2" data-width="690"></div>
This will allow unique comments per unique WordPress post. If you do not change this, then all comments would appear the same in all post!
Step9.) Download your existing single.php template. This is your theme single post template, used in generating your blog post content. Open it and paste the Facebook comment code just before the existing WordPress comment area (you can still have them). For example, see screenshot below (inside the red box):

You can customize further by implementing CSS styles, centering, etc.
Step10.)Upload the updated single.php and footer.php back to your WordPress server. Refresh and you would now see your Facebook comments integrated with WordPress blog posts.
Important Administration Configuration
To control spam and increase the quality of Facebook comments in your blog, the following are recommended:
Step1.) Enable moderation by downloading header.php template of your existing theme files. And then add the following code just after <head>.
<meta property="fb:app_id" content="YOUR_FACEBOOK_APP_ID">
<meta property="fb:admins" content="YOUR_FACEBOOK_USER_ID">
Replace “YOUR_FACEBOOK_USER_ID” AND “YOUR_FACEBOOK_APP_ID” with appropriate information, save and upload back to your server.
Step2.) Go to the Facebook moderation page while you are logged in to Facebook:
Step3.) Click “Settings”.
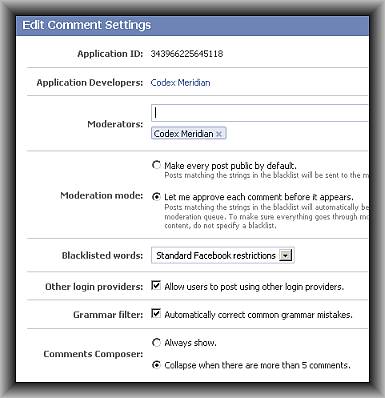
Step4.) Configure the following important items:
a.) Moderators: Add your name (the one you are using in Facebook).
b.) Select “Let me approve each comment before it appears”.
c.) Blacklisted words: “Standard Facebook restrictions”.
d.) Other login providers: Check.
e.) Grammar filter: Check.
f.) Comments composer: “Collapse when there are more than 5 comments”.
Click “Save”. This is how it looks like:
Step5.) Bookmark this URL:
http://developers.facebook.com/tools/comments
You should be visiting this URL on a frequent basis to moderate new comments.
![How to Use the Cat Command in Linux [22 Useful Examples]](https://hostingmate.net/wp-content/uploads/2023/06/how-to-use-the-cat-command-in-linux-22-useful-examples-768x336.png)