WordPress is the most popular CMS in the world. We tend to use wordpress to create personal blogs. In recent past creating multi author blogs is becoming popular. Most of the authors of popular blogs are experts in various subjects. As users we have a great opportunity to personally connect with them and learn something new.
So In this tutorial I am going to show you how to create a simple plugin to show post author related information. Lets get started.
Tutorial Contents
- Creating the Plugin File
- Retrieve Author Information
- Display Recent Posts from Author
- Contact Post Author
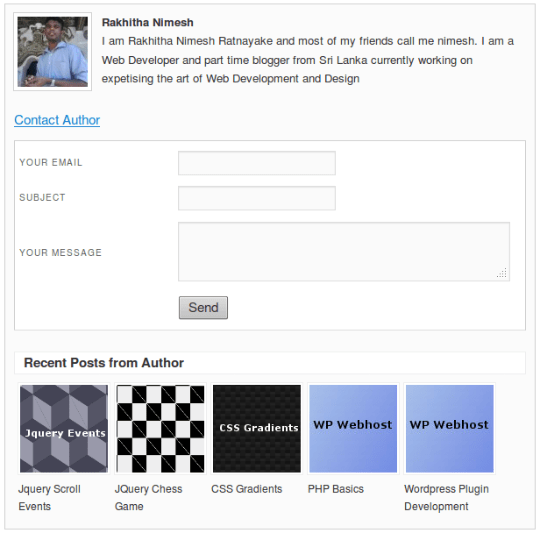
You can have a quick look at our final result in the following screen. Our author box has all the information relative to authors profile and contacting.
Creating the Plugin file
Creating a wordpress plugin is simple. Just go to the plugins directory inside the wp-content folder and create a folder with your plugin name. Inside the plugin create your main php file. This file should have a comment at the top which includes the information about the plugin. This information is used by wordpress to recognize our plugin and include in the admin plugins section.
I have named our plugin as WP Webhost Author Info. Following code shows you the list of information we need to include in the header of the main file.
/* Plugin Name: WP Webhost Author Info Plugin URI: https://wpwebhost.com/ Description: Show author information and related author post with author contact option Version: 1.0 Author: Rakhitha Nimesh Author URI: http://innovativephp.com/ License: GPLv2 or later */
Plugin Name is mandatory since wordpress will not able to show it in the plugin list if not available. Other parameters are optional. But including them will improve the reputation of your plugin. Now we are done with creating the plugin file. Lets create our author box.
Retrieve Author Information
In the author box we are going to include Author Photo ,Author Name and Author Bio as we showed earlier. So lets see how we can use wordpress built-in functions to retrieve the information about the author of current post.
WordPress provides a function called get_the_author_meta which can be used to get any information about a wordpress user. Take a look at our retrieve author information function.
function wpwh_get_author_information() { $wpwh_html = ''; $wpwh_post_author = get_the_author_meta('user_email'); $wpwh_html = "<div id='author_box'> <div id='author_gravatar'>" . get_avatar(get_the_author_email(), '80') . "</div> <div id='author_name'>" . get_the_author_meta('first_name') . " " . get_the_author_meta('last_name') . "</div> <div id='author_desc'>" . get_the_author_meta('description') . "</div> </div>"; return $wpwh_html;
}
- I have named the function as wpwh_get_author_information. You can have many plugins in single wordpress installation. So functions,variables,classes with same name will make conflicts in identifying correct one. Its always better to put unique prefix for your functions and variables. So I have uses wpwh as the prefix.
- HTML code for the author information box is stored in $wpwh_html variable.
- Author photo is retrieved using get_avatar function. Email of the author and the display size in pixels is passed to the function. This function will fetch the profile image from gravatar.com using your email.
- Then I have combined the first and last name of the author using get_the_author_meta function.
- Next I have the code for retrieving author bio using the description parameter.
- Finally author information HTML is returned to use in our main function which will be explained later.
Display Recent Posts from Author
Once we finished reading an interesting article,its a common thing to look for the person who wrote the article. We might like other articles written by same author. So its always good to include recent or best posts from author after his profile information. We have Recent Posts and Popular Posts in blogs. Recent author Posts and Popular Author Posts will be a great feature.
So we will move onto creating a function to get author posts from database.
function wpwh_get_author_posts() { global $authordata, $post; $wpwh_html = ""; $wpwh_author_posts = get_posts(array('author' => $authordata->ID, 'post__not_in' => array($post->ID), 'posts_per_page' => 5)); foreach ($wpwh_author_posts as $key => $wpwh_author_post) { if (has_post_thumbnail($wpwh_author_post->ID)) { $wpwh_html .= "<div style='float:left'><div class='author_post_img'>" . get_the_post_thumbnail($wpwh_author_post->ID, array(100, 100)) . "</div><div id='post_title'>$wpwh_author_post->post_title</div></div>"; } else { $url = plugins_url(); $wpwh_html .= "<div style='float:left'><div class='author_post_img'><img src='" . $url . "/wd-author-posts/default.jpg' /> </div><div id='post_title'>$wpwh_author_post->post_title</div></div>"; } } if($wpwh_html != ''){ $wpwh_html = "<div id='post_head'>Recent Posts from Author</div><div id='post_list'>".$wpwh_html."</div>"; } return $wpwh_html;
}
Above code will retrieve the recent posts from author of current post. I am going to explain the code by each section since there are some cool features you need to learn.
Query WordPress Posts
$wpwh_author_posts = get_posts(array('author' => $authordata->ID, 'post__not_in' => array($post->ID), 'posts_per_page' => 5));
You can use the get_posts function to retrieve wordpress posts based on certain conditions. In the parameter array I have given the conditions as author to get current author , post__not_in to avoid getting the current post again and posts_per_page to get 5 posts only. Other acceptable parameters and conditions can be found in wordpress codex.
Post Image Thumbnails
get_the_post_thumbnail($wpwh_author_post->ID, array(100, 100));
You can upload a image to display with the post using the featured image section of post creation screen. Then get_the_post_thumbnail allows you to retrieve the image as a thumbnail in various sizes. I have used the current post Id and 100px as the size of my thumbnail. More details about get_the_post_thumbnail.
Now consider the complete function code mentioned earlier.
- Posts are received using the get_posts function and we have to traverse through each post using a foreach loop.
- Inside the loop we check if a post image is available for current post using has_post_thumbnail function. Default image will be assigned in case where the post image is not available.
- We use the get_the_post_thumbnail to retrieve the image and creates a simple div container to include these posts.
Contact Post Author
This is the most important section of our plugin since it allows us to connect to post author to get more information and experiences. Its important to know that not all users will like to include this contact feature. So we have to provide opportunity for the author to decide whether contacting is allowed or not.
Customize WordPress Profile
WordPress allows us to easily customize the user profile screen and add more custom fields according to our requirements. Following section will explain the process of customizing the screen.
add_action('show_user_profile', 'wpwh_email_preferences');
add_action('edit_user_profile', 'wpwh_email_preferences');
There are 2 wordpress hooks called show_user_profile and edit_user_profile
which refers to using profile creation and edit screens. Each time one of these hooks are used, we call a function called wpwh_email_preferences to generate our custom fields.
<?php function wpwh_email_preferences($user) { $wpwh_email_status = (esc_attr(get_the_author_meta('wpwh_email_contact', $user->ID)) != 'allow') ? '' : 'checked';
?> <h3>Email Preferences</h3> <table class="form-table"> <tr> <th> <label>Allow Email Contact</label></th> <td> <input type="checkbox" name="wpwh_email_contact" id="wpwh_email_contact" value="allow" <?php echo $wpwh_email_status; ?> /><br /> </td> </tr> </table>
<?php
We have to use custom meta value for user to store the email preferences of author. I have defined the key as wpwh_email_contact which will be stored at wp_usermeta table. Lets move to the detailed code explanation.
- First we check if the value of wpwh_email_contact. Initially on profile creation this will be empty.
- Then we create the ncessary HTML to display the filed.
- Checkbox is used to select whether to allow contacting or disallow contacting.
Now we have the form fields to choose contact preferences. Lets see how we can save the values on profile creation or modification.
add_action('personal_options_update', 'wpwh_save_email_preferences');
add_action('edit_user_profile_update', 'wpwh_save_email_preferences');
As we did earlier there are another 2 hooks to call a custom function on profile creation or modification.
function wpwh_save_email_preferences($user_id) { if (!current_user_can('edit_user', $user_id)) return FALSE; update_usermeta($user_id, 'wpwh_email_contact', $_POST['wpwh_email_contact']);
}
We call wpwh_save_email_preferences function each time profile is updated. First we check whether current user has the necessary permission to update profile. Then our custom meta value is updated on database.
Now we have completed creating and saving email contacting preferences functionality for authors. It’s time to add some ajax functions to send emails to authors.
Creating Email Form
We have to create a simple form to send emails. This form will not be visible initially. Once you click on Contact Author link it will show up. Users will not be able to see the email screen for the authors who have decided not to allow email contacting.
function wpwh_send_email_box() { global $authordata; $wpwh_email_status = get_the_author_meta('wpwh_email_contact', $authordata->ID); $wpwh_html = ''; if ($wpwh_email_status == 'allow') { $wpwh_html = ' <p><a href="javascript:void(0)" onclick="toggle_email();">Contact Author</a></p> <div id="email_panel"> <div id="errDiv"></div> <div id="sucessDiv"></div> <table class="author_emails"> <tr> <th> <label>Your Email</label></th> <td> <input type="text" name="wpwh_email" id="wpwh_email" /> </td> </tr> <tr> <th> <label>Subject</label></th> <td> <input type="text" name="wpwh_subject" id="wpwh_subject" /> </td> </tr> <tr> <th> <label>Your Message</label></th> <td> <textarea name="wpwh_message" id="wpwh_message" ></textarea> </td> </tr> <tr> <th> <label></label></th> <td> <input type="hidden" id="wpwh_author_id" value="'.$authordata->ID.'" /> <input type="button" value="Send" id="send_author" onclick="contactus()" /> </td> </tr> </table></div>'; } return $wpwh_html;
}
Configuring Scripts and Styles
In order to add ajax we need to use jquery functions. So this section will show you how to properly include your scripts and styles inside a plugin.
function wpwh_scripts() { wp_enqueue_script('jquery'); wp_enqueue_script('wpwh_functions', plugins_url('/functions.js', __FILE__), 'jquery'); wp_enqueue_style('wpwh_style', plugins_url('/styles.css', __FILE__));
} add_action('wp_enqueue_scripts', 'wpwh_scripts');
There is a wordpress hook called wp_enqueue_scripts used in include scripts and styles. Since jquery is built into wordpress we need to include it using wp_enqueue_script(‘jquery’)
For custom scripts, we need to provide a unique name and path to the js file as shown above.
Stylesheets can be included using wp_enqueue_style function.
Adding Ajax Capability
Ajax is handled in wordpress using some special function. Lets add ajax functionality to our email contacting.
add_action('wp_ajax_wpwh_email_action', 'wpwh_email_callback');
add_action('wp_ajax_nopriv_wpwh_email_action', 'wpwh_email_callback');
WordPress provides 2 built in hooks called wp_ajax and wp_ajax_nopriv. You should specify a name for your action and callback function as shown above. Logged in users uses wp_ajax and other users can use wp_ajax_nopriv.
So lets create our email sending function.
function wpwh_email_callback() { global $authordata,$wpdb; $contact_subject = $_POST['wpwh_subject']; $contact_email = $_POST['wpwh_email']; $contact_message = $_POST['wpwh_message']; $author_id = $_POST['wpwh_author']; $msg = "Name : $contact_name rn Email : $contact_email rn Messsage : $contact_message "; $author_email = get_the_author_meta('user_email', $author_id); if(wp_mail($author_email , $contact_subject, $msg)){ echo "Message Sent Successfully"; }else{ echo "Message Sending Failed"; } exit;
}
This function is self explanatory. We just get the values of our email form using $_POST and sent the email using wp_mail function.
Finalizing Plugin
I have explained the functions of plugin and how its used. Plugin includes a js file called functions.js which is used to validate our email form and make the ajax request. Take a look at functions.js file and you will understand the code easily.
Now we returned results from all the functions. Lets use them inside the main function to complete the plugin.
function wpwh_generate_author_box($content) { if (is_single ()) { $wpwh_author_info = wpwh_get_author_information(); $wpwh_author_posts = wpwh_get_author_posts(); $wpwh_email_box = wpwh_send_email_box(); $wpwh_html = "<div id='author_panel'>" . $wpwh_author_info . $wpwh_email_box . $wpwh_author_posts . "</div>"; return $content . $wpwh_html; } else { return $content; }
} add_filter('the_content', 'wpwh_generate_author_box');
- Author box will be displayed under each post. So I have used the_content filter, which is called when the post content is loaded.
- We are only including the author box in post detail page. So I have used is_single function to make the validation.
- Then we call all other functions described earlier and add the HTML to end of the post.
Now I have explained the complete plugin creation. You can download and experiment with it using various other author information and css styles.
Add to your Knowledge Base
I have included a list of things we learned throughout this tutorial. I hope adding this to your knowledge base will improve the wordpress skills.
- Customizing wordpress profile screen with custom fields.
- Including scripts and style-sheets properly.
- Making ajax requests for logged users and normal users.
- Working with post thumbnails.
- Retrieving wordpress user information.
Discover more from Hosting Mate
Subscribe to get the latest posts sent to your email.