htaccess is a powerful configuration file in Apache web server. When used properly with your WordPress website; you can get a lot of benefits in terms of security, speed and efficient URL management.
This tutorial will list down all possible tips that any webmaster can use to improve and manage the WordPress site. As a basic requirement, this tutorial works best if the site is running in LAMPP servers (Linux/Apache/MySQL and PHP) with mod_rewrite module enabled where it natively supports .htaccess application.
Beginner short guide on .htaccess
This setion is for a complete beginner. If you already know these things, skip and go directly to the next section.
Important: Bear in mind that .htaccess is a hidden file in some servers. If you are using Filezilla, you need to enable “Force showing hidden files” to check if there is an .htaccess in that folder/directory. This can be set by launching Filezilla – Server – check “Force showing hidden files” then click OK. Do this before connecting to the server.
A.) Creating a new .htaccess file to be placed in any folder of your WordPress website (assuming no .htaccess is currently implemented on that specific folder)
1.) Open any text editor (notepad).
2.) Create new/blank file.
3.) Paste the .htaccess commands/syntax that you would like to implement.
4.) Save it as:
.htaccess
Important: Don’t forget to include the dot sign before the htaccess filename, this is a requirement.
5.) Upload .htaccess to the folder that you would like it to be implemented.
6.) Clear your browser cache (history, etc.) and test the result in the browser.
B.) Editing an existing .htaccess file of an existing folder:
1.) Download it to your desktop using an SSH/FTP client such as Filezilla.
2.) Do a backup and put that in a separate folder. This is very important. If the .htaccess does’nt work as expected, you can restore the old htaccess in the backup.
3.) Open the .htaccess using a text editor. You can right click on it and open with notepad.
4.) Implement the new .htaccess code changes. Save it.
5.) Upload it back to the same folder where it was downloaded.
6.) Clear the browser cache and test the result.
Security tips using .htaccess
1.) Prevent public access to sensitive folders within your WordPress server.
Code:
deny from all
Note: If you are concern that someone might access the sensitive files in a folder. You can completely prevent the access by using the above syntax. This will block everything even search engine bots and other crawlers.
In some servers, this will return 403 forbidden status.
2.) Protect your wp-admin from unauthorized access:
Code:
Order allow,deny
Allow from xxx.xxx.xxx.xxx
Note: Go to this URL and get your IP address. Replace xxxx.xxx.xxx.xxx with your IP and upload it back to your wp-admin directory only. This makes you the only person authorized to access the WordPress admin directory. You can add another IP address by inserting another “allow from” syntax.
3.) Ban a spammer/abusive user, crawler or scraper IP address accessing your entire WordPress website:
Code:
order allow,deny
deny from xxx.xxx.xxx.xxx
allow from all
Note: Replace xxx.xxx.xxx.xxx with the offending IP address. You can get this from your server logs or comments section in WordPress. Make sure you put this line above all existing .htaccess syntax. This line will be added to your WordPress root directory .htaccess, example:
#This line will block all spammer IP
order allow,deny
deny from xxx.xxx.xxx.xxx
allow from all
<IfModule mod_rewrite.c>
RewriteEngine On
RewriteBase /
RewriteRule ^index.php$ – [L]
RewriteCond %{REQUEST_FILENAME} !-f
RewriteCond %{REQUEST_FILENAME} !-d
RewriteRule . /index.php [L]
</IfModule>
Basic WordPress URL Management using .htaccess
1.) 301 redirect single URL to another URL in your domain or another domain
Code:
redirect 301 /old_URL_path http://www.example.com/new_URL_path
Note: Supposing you have this old URL:
http://www.example.com/old_url.htm
And you want to 301 redirect to this path:
http://www.example.com/new_url.htm
Then the 301 redirect syntax will be:
redirect 301 /old_url.htm http://www.example.com/new_url.htm
This will be implemented in your WordPress root directory .htaccess.
2.) 301 redirecting “difficult” URL
Code:
RedirectMatch 301 ^(.*)string_in_your_URL(.*)$ http://www.example.com/new_URL_path
Note: If you find out that “redirect 301” won’t work because the URL contains some odd characters; then use RedirectMatch. Identify a string or word in your URL without containing that odd character and use it as a match. This works similar to “redirect 301” only that it uses a string to match the URL.
3.) Bring down your entire WordPress website to maintenance mode without accessing admin panel:
Code:
RewriteEngine On
RewriteBase /
RewriteCond %{REMOTE_ADDR} !^xxx.xxx.xxx.xxx
RewriteCond %{REQUEST_URI} !^/503.php
RewriteRule .* 503.php [L]
Replace xxx.xxx.xxx.xxx with your own IP adddress. Add that line before any existing code in the WordPress .htaccess. Create 503.php containing the code:
<?php
header('HTTP/1.1 503 Service Temporarily Unavailable');
header('Status: 503 Service Temporarily Unavailable');
header('Retry-After: 10800');
header('X-Powered-By:'); ?>
<html>
<head>
<title>IMPORTANT WEBSITE MAINTENANCE!</title>
</head>
<body>
<h1>Doing maintenance</h1>
<p>This site is under maintenance right now.</p>
<p>This should be ready again in under 3 hours.</p>
</body>
</html>
Upload both .htaccess and 503.php to your website root directory.
Moving WordPress Installation from Folder/Directory to Subdomain
This is one of the more complex .htaccess implementations in WordPress:
Code:
RewriteEngine on
RewriteBase /
redirect 301 /wordpress_name http://wordpress_name.example.com
<IfModule mod_rewrite.c>
RewriteEngine On
#RewriteBase /wordpress_name/
RewriteRule ^index.php$ - [L]
RewriteCond %{REQUEST_FILENAME} !-f
RewriteCond %{REQUEST_FILENAME} !-d
RewriteRule . /index.php [L]
</IfModule>
Note: You need to edit the main WordPress .htaccess found in the same path as wp-config.php. To make sure the above code will work for you. The following will be the requirements:
a.) You have an existing WordPress installation in a folder or directory where the homepage URL is accessible by the browser as:
http://www.yourdomain.com/wordpress/
or whatever name you assigned to your WordPress site, e.g. as a blog:
http://www.yourdomain.com/blog/
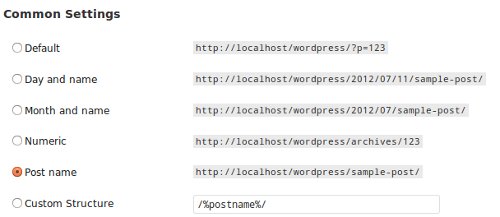
b.) You are not using the default settings of permalink in your site. You will know this logging into the admin panel and go to Settings – > Permalink. For example the screenshot below didn’t select the default setting:
c.) You have mod-rewrite module enabled in your Apache server.
Example implementation:
Supposing you have a WordPress blog installed and accessible as:
http://codex.tld/wordpress/
You decided to move it to a sub-domain such as that the canonical URL would now be http://wordpress.codex.tld/. And you would like all WordPress URLs to inherit the sub-domain URL format (e.g. http://wordpress.codex.tld/hello-world/).
Assuming all requirements are meet, the following are the steps:
Step1.) Configure the existing WordPress folder installation to be used as a subdomain. This will be done in a hosting control panel such as cPanel.
The steps might vary from one web host to another if it is not using cPanel; so for complete guidance, refer to your web host.
For example, below is how to configure the WordPress folder to be used as a sub-domain in cPanel:
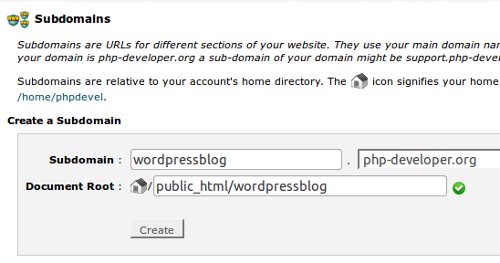
WordPress is originally installed as a folder in the path:
/public_html/wordpressblog
The assigned name of the subdomain will also be “wordpressblog” that is the name of the folder/directory where WordPress is currently installed.
If the domain name is php-developer.org, the WordPress blog will now be accessible in the sub-domain format as:
http://wordpressblog.php-developer.org
Wait for a couple of minutes for cPanel to configure the changes. This can take up to 5 minutes in some host.
Step2.) Clear your entire browser cache. Try accessing the new sub-domain URL in the browser, the homepage should load but the post, categories and pages are still loading the old URL’s.
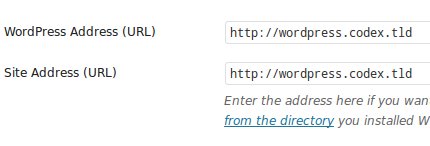
Step3.) Update your siteURL and home URL in your WordPress admin panel. Login using your old WordPress admin URL: http://www.yourdomain/wordpress/wp-admin
Go to “Settings” – “General”. Change “Wordpress Address” and “Site Address” to use the new subdomain URL. Example:

Scroll down below and click “Save Changes”.
Step4.) Download your WordPress .htaccess (that is found in the root directory in the same path as wp-config.php). Make a backup of it. Then change the following lines from:
<IfModule mod_rewrite.c>
RewriteEngine On
RewriteBase /wordpress/
RewriteRule ^index.php$ - [L]
RewriteCond %{REQUEST_FILENAME} !-f
RewriteCond %{REQUEST_FILENAME} !-d
RewriteRule . /wordpress/index.php [L]
</IfModule>
TO:
RewriteEngine on
RewriteBase /
redirect 301 /wordpress http://wordpress.codex.tld
<IfModule mod_rewrite.c>
RewriteEngine On
RewriteRule ^index.php$ - [L]
RewriteCond %{REQUEST_FILENAME} !-f
RewriteCond %{REQUEST_FILENAME} !-d
RewriteRule . /index.php [L]
</IfModule>
NOTE: Change “wordpress” in the folder name as well as the subdomain name “wordpress.codex.tld” to reflect your actual values.
Step5.) Upload the .htaccess back to your WordPress directory. Clear your browser cache again and load the WordPress homepage in the browser using the subdomain URL.
Check the post, categories, page and archive URLs in your WordPress site to confirm if they are loading properly without any server or not-found errors. Check if all URLS are now inheriting the subdomain URL structure.
Step6.) Confirm if you can login back to your WordPress admin normally. Use the new subdomain URL for logging in, for example:
http://wordpress.codex.tld/wp-admin
Step7.) If you can login, the subdomain installation is correct. Confirm the plugins, themes, etc. to see if they are still working properly.
This strategy works well with search engines as it will do a 301 redirect (permanent redirection) from the old URL structures to the new subdomain structure in WordPress.
