If you’ve ever used Debian or Debian-based distributions like Ubuntu or Linux Mint, then chances are that you’ve used the apt package system to install or remove software.
Even if you’ve never dabbled in the command line, the underlying system that powers your package manager GUI is the APT system.
Today, we are going to take a look at some familiar commands dive into some less or more frequently used apt commands, and shed some light on this brilliantly designed system.
What is APT?
APT stands for Advanced Package Tool, which was first seen in Debian 2.1 back in 1999. Essentially, APT is a management system for dpkg packages, as seen with the extension *.deb.
It was designed to not only manage packages and updates but also to solve the many dependency issues when installing certain packages.
As anyone who was using Linux back in those pioneer days, we were all too familiar with the term “dependency hell” when trying to compile something from source, or even when dealing with many of Red Hat’s individual RPM files.
APT solved all of these dependency issues automatically, making installing any package, regardless of the size or number of dependencies a one-line command.
To those of us who labored for hours on these tasks, this was one of those “sun parting the clouds” moments in our Linux lives!
Understanding APT Configuration
The /etc/apt/sources.list file is a configuration file that specifies the repositories from which the package manager (apt) retrieves and installs software packages. This file contains a list of URLs (Uniform Resource Locators) for the repositories, along with details like distribution codename and components.
Here’s an example of what an /etc/apt/sources.list file might look like:
sudo cat /etc/apt/sources.list

As you can probably deduce from my /etc/apt/sources.list file, I’m using Ubuntu 22.04 (ammy Jellyfish). I’m also using three repositories:
- Main Repository
- Universe Repository
- Ubuntu Security Repository
The syntax of /etc/apt/sources.list file is relatively simple:
deb (url) release repository
The accompanying line is the source file repository. It follows a similar format:
deb-src (url) release repository
This file is pretty much the only thing you’ll ever have to edit using APT, and chances are that the defaults will serve you quite well and you will never need to edit it at all.
However, there are times when you might want to add third-party repositories. You would simply enter them using the same format, and then run the update command:
$ sudo apt update
We’ve taken a look at our /etc/apt/sources.list file and now know how to update it, so what’s next? Let’s install some packages. Let’s say that we are running a server and we want to install WordPress.
First, let’s search for the package:
sudo apt-cache search wordpress

What is APT-Cache?
Apt-Cache is a command that simply queries the apt-cache. We passed the search parameter to it, stating that we want to search APT for it. As we can see above, searching for “wordpress” returned several packages that related to the search string with a short description of each package.
From this, we see the main package of “wordpress – weblog manager,” and we want to install it. But wouldn’t it be nice to see exactly what dependencies are going to be installed along with it? apt can tell us that as well:
sudo apt-cache showpkg wordpress
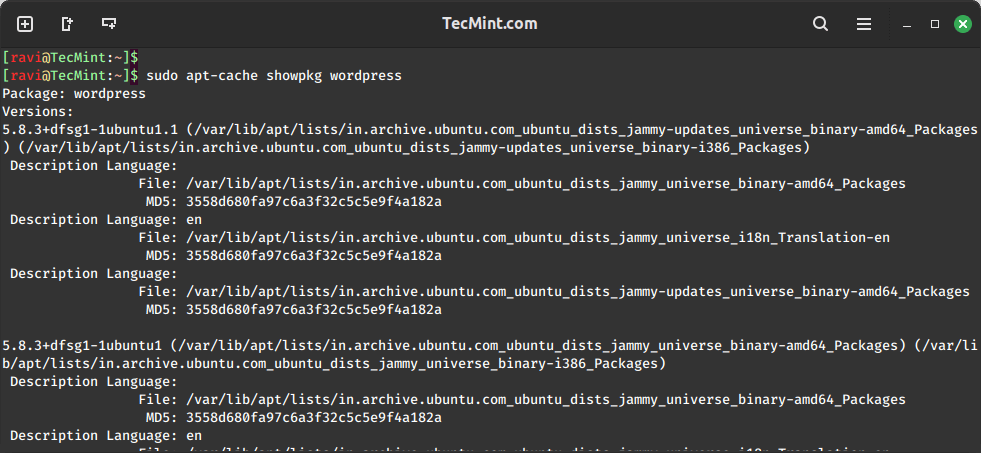
This shows us that wordpress 5.8.3 is the version to be installed, the repository it is to be installed from, reverse dependencies, and other packages it depends on, plus their version numbers.
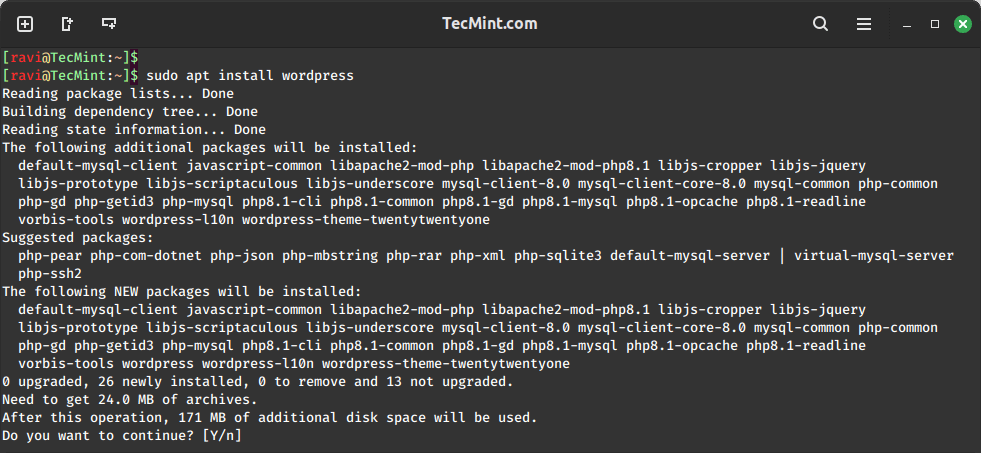
Now, the actual install command:
sudo apt install wordpress
That command will install WordPress-5.8.3 and all dependencies that are not currently installed.
Of course, that is not all you can do with APT. Some other useful apt commands are as follows:
Uninstalling a package is just as easy as installing the package:
sudo apt remove wordpress
Unfortunately, the apt remove command leaves all of the configuration files intact. To remove those as well, you’ll want to use apt purge:
sudo apt purge wordpress
Now and then, you might run across a situation where there are broken dependencies. This usually happens when you don’t run the apt update properly, mangling the database. Fortunately, apt is a fix for it:
sudo apt –f install
Since apt downloads all of the *.deb files from the repository right to your machine (stores them in /var/cache/apt/archives) you might want to periodically remove them to free up disk space:
sudo apt clean
This is just a small fraction of apt, apt-cache, and some of its useful commands. There is still a lot to learn and explore some more advanced commands in the below article.
As always, please have a look at the man pages for even more options. Once one gains familiarity with apt, it is possible to write awesome Cron scripts to keep the system up to date.