WordPress is a very comprehensive Content Management System (CMS) that has powered 30% of the Internet websites. While the default installation works out of the box, there are a couple of settings that should be updated to reflect a better branding, security, and performance for your website. Let’s dive into the details.
Step 1: Update Your WordPress Setting
Change The Title, Tagline and reading Setting.
The title and tagline will reflect how your website showing to your visitors on their browser. It’s good to change this to reflect the actual goal of your website to help the SEO.
To change these, go to your Settings in your dashboard and choose General. Change both your site title and tagline to something that relates to your site.

Change the Premalink Structure
Unfortunately, the default permalink structure — the URL structure that tacked on the end of your site name — of WordPress is not very Google friendly. As that is the case, you should be sure to alter this to something else.

Go back to Settings and then select Permalink from the menu. There you will find a few different choices for setting a new structure. The best ones to use are either the Day and Name or Post Name options.
Configure the Reading Settings
While in the Settings area of your dashboard, you should also configure the Reading settings. Here you can set what your front page display will be.
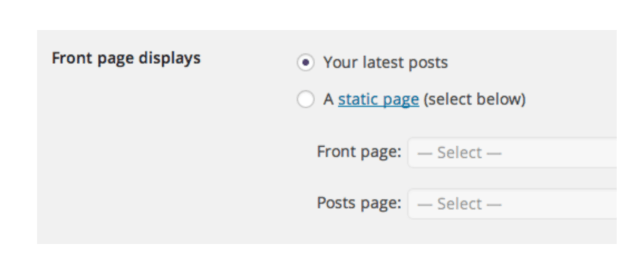
This part is great if you want to have a custom homepage to display your services and have a separate page to display all your blog posts.
Navigate over to the Reading option in the menu and decide if you want your front page to show your latest posts or if you want to use a static page. Make your choice and then save your changes. You can always change this one later, so don’t feel too pressured.
Step 2: Secure Your WordPress Installation
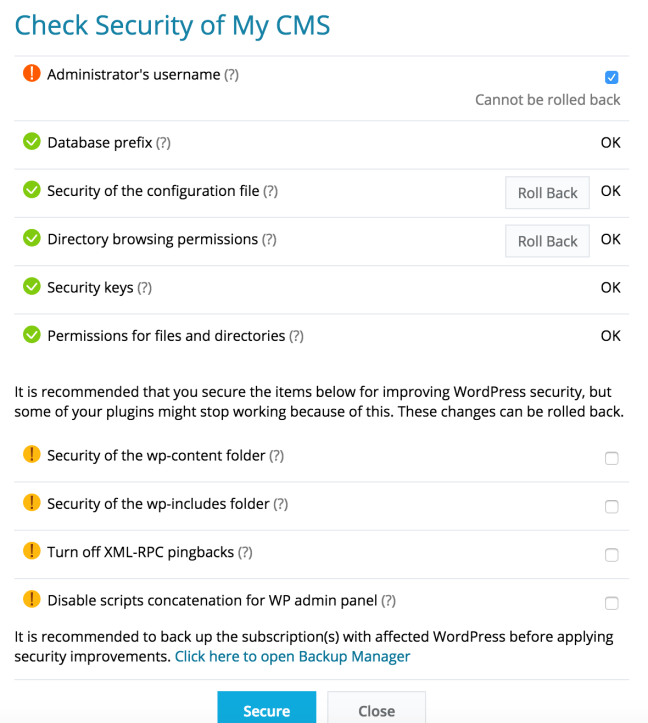
The default installation of WordPress leaves a couple of security setting that potentially would make your WordPress website vulnerable to attack. It’s highly recommended to get these items secured for your on-going WordPress usage.
Rather than making this changes manually, you can easily get this done with just a few simple mouse click with the WordPress Toolkit that’s bundled with any of our WordPress Hosting plans.
Step 3: Activate Your FREE SSL (HTTPS) For Your WordPress Website
With the latest Chrome browser marking HTTP websites as “Not Secure”, HTTPS has become one of the important criteria for each of the websites running on the Internet.
Each of the WordPress Hosting plans provide Unlimited FREE SSL Certificate bundle with our WordPress hosting powered by Let’s Encrypt. Enable SSL for your WordPress hosting would simply just a few clicks away.
Step 4: Activate Jetpack For Your WordPress Website
There’s total of 55,000+ of WordPress plugins available from WordPress plugin repository (growing each day as WordPress community continue to contribute new plugins each day) and Jetpack gives you the 44 most important plugins that you would need for your WordPress website.
With the WordPress hosting subscription you have with WPWebHost, Jetpack comes pre-built into your WordPress installation and there are few steps needed to be done completed to enjoy the full fledge of Jetpack that can help you build a better WordPress website (depending on which plan you have subscribed).
Step 5: Setup Your Email Account
Your WordPress hosting subscription provides you a standard email access that allows you to send/receive emails using your blog’s domain. Sending email with your own domain gives you a better personal branding vs when you use other free email services.
Setting up your email account will just require few simple easy steps to login to your control panel dashboard.
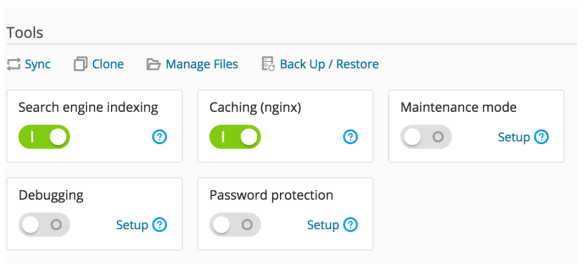
Step 6: Turn on Search Engine Index and Caching
Enabling indexing will allow search engine such as Google to crawl your website for content you have generated. The default WordPress installation does not have this turn on. You can easily get this done with just a few mouse clicks.
Enabling additional caching for your website will further speed up the loading of your WordPress website. With a better loading speed, your website loads faster and provide a better browsing experience for your readers.
To enable search engine indexing for your WordPress website, click on the “My CMS” link (as “Step 2” above). On the next page that shows up, toggle the button on “Search engine indexing” and “Caching (nginx)” to have it turn on for your WordPress website.
Step 7: Turn on Automatic Updates For Your WordPress
The automatic updates of WordPress are recommended to turn on for your website. Enabling automatic update will allow auto-patching your WordPress installation including the core, plugins, and themes to the latest release. You can easily get this configured for your WordPress installation without the need to login to check this manually every day.
Nevertheless, one of the most powerful part of WordPress is the plugins and themes, to get the best ideas and review here.
Do you have any other suggestion on setting up WordPress website? Let us know in the comments section below! Or you may get more idea here.

