Typically, most bloggers will decide to do this as they see a couple of limitations on their WordPress.com hosting that limit their website to further grow beyond what WordPress can actually do.
Thankfully, migrating your website or blog from your existing WordPress.com account out to a self-hosted environment is not a complicated process. Here are 7 simple steps that you can do it quickly on your own.
- Find a WordPress Hosting Provider
- Install WordPress on your new hosting subscription
- Export your current content from your WordPress.com account
- Import the content to your new WordPress hosting server.
- Update Reading Settings & Site Redirect
- Move your Jetpack Subscribers & Stats
- Update your WordPress Domain to Point to your new WordPress hosting DNS
1. Find a WordPress Hosting Provider
You need a new WordPress hosting provider to continue to host your existing WordPress post/pages from your WordPress.com account. Rather than choosing a normal hosting provider, you may want to consider a Managed WordPress Hosting solution provider that can give you:
- Performance Optimized Environment – Run your WordPress with blazing fast loading speed on the latest technology of PHP 7.x, HTTP/2, NGINX and Memcached on an SSD storage.
- Enhanced Security & Backup Protection – Automatic daily malware scanning & patching with backup included top up with FREE HTTPS SSL Certificate.
- The daily malware scanning will ensure your WordPress website is scanned from any malware infection. As WordPress is an open source application, it’s easily get compromised with if it’s not protected. This is just like an Antivirus installed on your computer.
- Backup will ensure you have a restore point in the event on any worst case scenarios that you have accidentally removed any files.
- The FREE SSL Certificate gives your WordPress website a secure encryption between your visitor’s browser and the WordPress hosting servers. It helps to encrypt all the information (such as if you have any Contact Form or sensitive information) transmitted over to your WordPress website.
- WordPress Toolkit – Allowing you to manage your WordPress easily 1-Click Security Hardening, Site-Staging, GitHub & easy migration tool from other hosts.
- 1-Click WordPress Security Hardening – Most WordPress installation is done on the default and there is certain security area such as renaming your database table prefix, hardening the wp-content folders..etc that can help further tighten up your WordPress.
- Site-Staging – This will allow you to duplicate your existing WordPress site to a sandbox (testing) environment. This will allow you to run test on any plugins or themes without risking to test in on your production site that can impact your user experience.
- Github – Sync all your changes from your Github account to your WordPress website easily with Github.
- Premium Themes & Domain Included – With Premium themes, it will save you the hassle to look for the perfect themes that you will need. On a certain occasion, if you are running your website with a WordPress.com subdomain, there’s a good chance you can get a FREE domain included with your hosting plan. We recommend going for a .BLOG domain instead of .com.
- Good Turn Around on Support Resolution – One of the typical requirement any hosting requirement will be looking is for the support services. You need your new host able to resolve your issues as something goes wrong.
2. Install WordPress on your new hosting subscription
Installation of the new WordPress can be done on the manual way or automated. You will find some host that probably offering you the 1-Click WordPress installation option via Softaculous. But if you are on a Managed WordPress Hosting provider, typically your new WordPress installation is ready as your hosting subscription is created – we call this instant provisioning 🙂
3. Export your current content from your WordPress.com account
The fun part begins here.
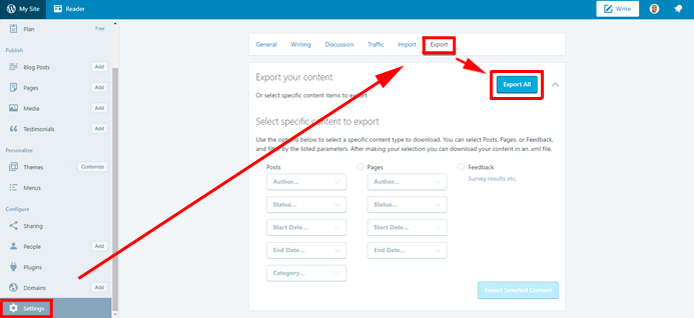
In your WordPress.com dashboard, go to My Site → Settings and select Export under Site Tools at the bottom to download an XML file of all of your content. Click on the arrow next to the Export All button if you want to select specific content items to export.
4. Import the content to your new WordPress hosting server.
In the WP Admin area of your self-hosted WordPress site, go to Tools → Import → WordPress.
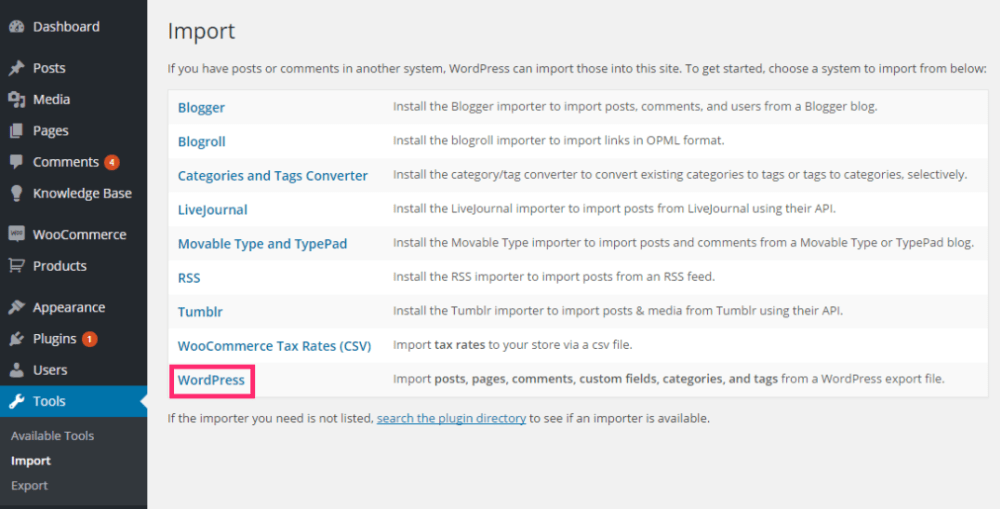
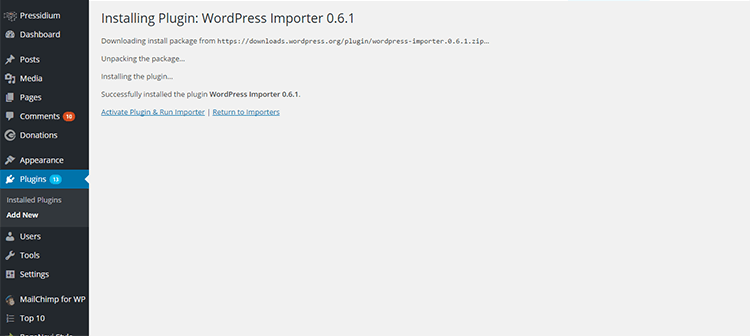
If it hasn’t been installed yet, you will be prompted to install the WordPress Importer plugin.
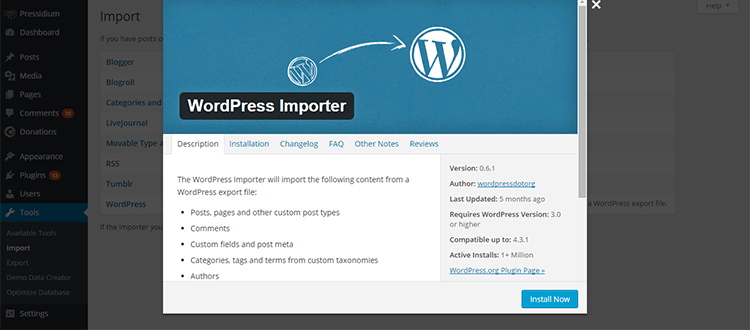
Click on the Install Now. After the installation is completed, Activate the plugin and run the importer.
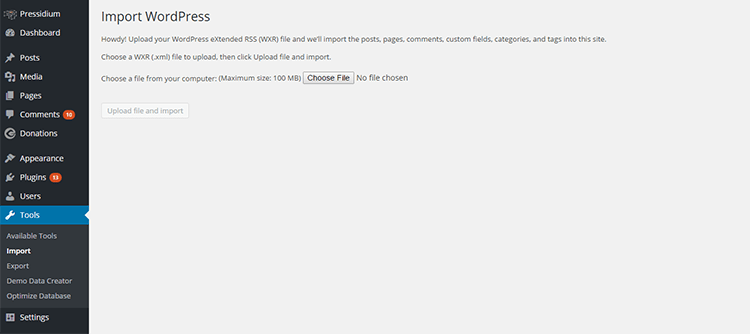
Choose your XML file that you have exported from your WordPress.com account, click Upload file and import, and select the option to Download & import file attachments and import your XML file.
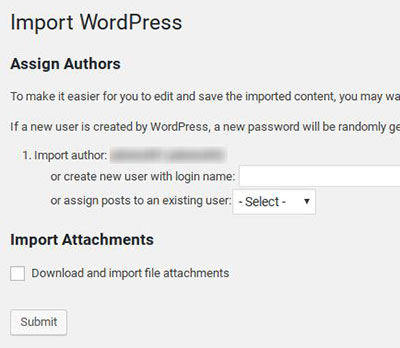
Once you hit the Upload file and import, the next screen pretty much will be asking you to assign an author for your existing Posts.
Since you will be inserting new posts and pages WordPress needs to know who will be their author. On the next page, you can either select an existing user as posts author, or you can create a new one for the imported data. Note that you should check the Download and Import file attachments checkbox if you want your photos and other attachment to be transferred too. Finally, click on the Submit button.
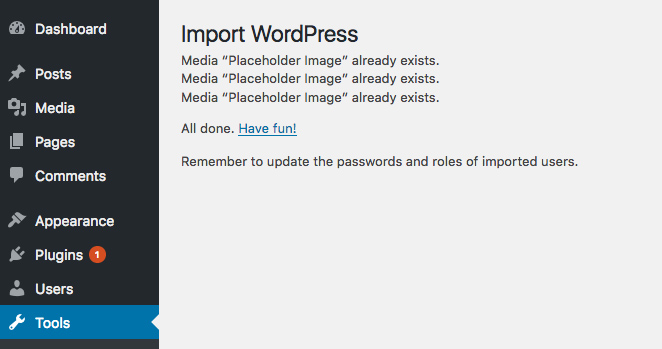
If the content which you want to migrate is quite large the corresponding web server’s timeout value can be reached before the data is fully copied. In this case, you need to re-upload the .xml file. The system keeps a record of the migrated content and will proceed with the remaining data. Repeat the procedure until you receive a confirmation that the process is successfully completed.
5. Update Reading & Premalink Settings and Site Redirect
At your self-hosted WordPress admin dashboard, navigate to Settings > Reading to update the setting to changes accordingly.
If you are changing your WordPress domain to a new domain, you will need to purchase the Site Redirect option at your WordPress.com account in order to maintain your existing post/pages. Depending on the volume of your visitors are, 1-2 years are good enough to get your traffic routed to the new domain.
You will also need to update the Premalink settings at your self-hosted WordPress admin at Settings > Premalink to reflect the exact setting that matches your WordPress.com setting. WordPress.com uses the following format as the premalink link:
http://example.com/2014/10/21/sample-post/
If the new site you’re redirecting to does not use this permalink structure, the redirect will try to find a post on your new site that matches the post URL from your WordPress.com site, but some visitors may see an error message indicating no matching post could be found.
6. Move your Jetpack Subscriber and Stats
Moving to a self-hosted WordPress site doesn’t mean you will lose all the followers you’ve built up on your WordPress.com site. With the Jetpack plugin (preinstalled and included in your WordPress Hosting plan) you can migrate your subscribers to the new site with the click of a button. Now that you’ve installed and activated Jetpack, just follow the instructions for the subscription migration tool.
Note: Social Media follower counts are a feature that’s only available on WordPress.com stats. Jetpack-connected self-hosted sites will only show WordPress.com followers and email subscribers. Re
Stats
With Jetpack you can also keep the stats you’ve built up on your WordPress.com site. As there’s no automated way to do this, you can reach out to Jetpack support (free with all the plans) to start the engagement to move your setting over.
7. Update your WordPress Domain to Point to your new WordPress hosting DNS
The last steps involved in updating your domain DNS to resolve to your new WordPress Hosting provider Web Server IP. This information usually is available on the control panel of your new host.
That’s all the steps involved to switch your WordPress site to your new self-hosted environment. Share with us on any of your past experience to move from your WordPress.com to your self-hosted WordPress hosting below.
** The above steps will only transfer your post, pages and media files from WordPress.com to your self-hosted WordPress website. Any custom themes or plugins that you may have enabled on your WordPress account, you will have to get it to reinstall again.
