Last June 27, 2012, WordPress released its version 3.4.1 to the public. This update includes some maintenance and security update to the WordPress core. This update requires an upgrade of the WordPress MySQL database.
This guideline will list some of the recommended practices on upgrading your WordPress core to this version and for dealing with the resulting issues.
Important Technical Requirements
WordPress 3.4.1 requires a PHP version 5.2.4 or higher. It also requires at least MySQL version 5.0. You can find the details on this page.
If you are not sure, login to your hosting control panel (or contact your web host) where you can obtain this information. There are many issues that are caused by incompatible PHP and MySQL version. This can only be resolved by upgrading your PHP or MySQL version first before upgrading WordPress.
For example, below is the PHP and MySQL version of the web host provided by cPanel:
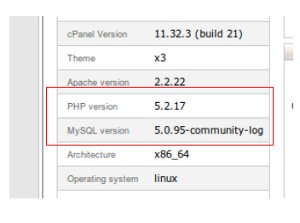
This is a requirement before you hit that update button in your WordPress admin panel.
Perform Backups – Another Requirement
You can never sure that your site will still work normally after the upgrade. Remember that this upgrade alters the database and some of the scripts so make sure you do a backup. The easiest ways to make a backup is the following:
1.) Use Filezilla SSH (for security reasons because you will be downloading scripts to your desktop that contains passwords such as wp-config.php).
2.) Connect to your WordPress server and download the following important files:
a.) .htaccess
b.) wp-content
c.) wp-config.php
d.) Other scripts that you have modified
wp-content contains your theme files and plug-ins. .htaccess could contain your important server side redirects that you have implemented before. And wp-config.php contains your WordPress database connection parameters. So make sure you have downloaded all of them to your desktop.
In the “other scripts you have modified”, these are the scripts that are NOT meant to be edited but you modify them for some reason. Example of this is that you add some PHP code to your WordPress root index.php, or any scripts in the wp-includes. Of course, editing the WordPress core files is not recommended because this will not survive after an upgrade (the edited core files will be overwritten) and not a secure method.
You need to back up these files so that you can still use them temporarily after the upgrade and have it placed in your server for the site to run normally. After doing this, I suggest that you will find a way to transfer these scripts either to your theme functions.php or a plug-in (by hiring a plug-in developer to write a script). By doing this, you are not editing core files and it will be not be affected in future WordPress upgrades.
One of the most difficult problem is forgetting what files are being edited. This is what happens if you don’t log what files are being edited in your WordPress site. The following steps are recommended:
a.) Login to your WordPress server using Filezilla.
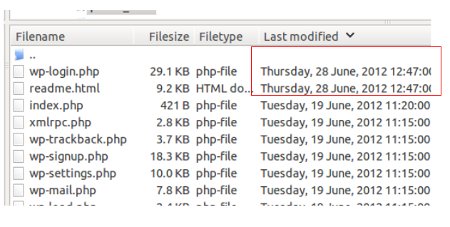
b.) Filezilla will list down the modification date of the files. Use this information to know which files have recently modified date. These are usually the files that are edited. See screenshot:

It shows that wp-login.php and readme.html are recently edited files because of the date.
NOTE: If you are unsure what files are being modified that could be affected by the update, then download the entire files in your WordPress server including the core files. This will ensure that you have backups to your entire files that you can use to revert in case of failed upgrade.
3.) It’s time to back up your WordPress database. For details, you can read this great guide by WordPress on doing database backups.
4.) Take note of the current WordPress version that you are using, you can do this by accessing the readme.html in the browser such as this:
www.yourdomain.com/readme.html
It can provide information of the current version and be sure to take note of this.
Troubleshooting Guide after Auto-Updating
Assuming you have fully backup your theme files and database, its time to hit the upgrade button:
1.) Login to your WordPress admin panel.
2.) You should see a banner that says something like “Wordpress 3.4.1 is available. Please update now.” Click on the link.
3.) Finally click “Update now”.
WordPress will automatically update the wordpress core files and database. If you made some changes to your core files, it will be overwritten.
Then take a deep look at your site after the upgrade, view it on the browser with cache cleared while still logged-in as admin. Make sure that your site operates normally as before without any errors or distortion in the template.
Make sure that it returns 503 server header status.
Possible Issue #1. Website is not running normally because of overwritten files.
Solution: In the first section, you should know what files are being affected, temporarily replace them with the originally edited files in your backup. It should work normally. The long term solution is to transfer those scripts to your theme functions.php or find an equivalent plugins that can provide the functionality.
Possible Issue #2. Theme files looks distorted or plugin does not operate normally.
Solution: WordPress update does not touch your theme and plugin files by default. It implies that the theme or plugin is not compatible with the new version. The solution is to contact the theme/plugin developer for some solutions. For the meantime, you can revert back to WordPress 3.4 (see separate section below).
Reverting back to previous WordPress version
You can only bring your site into maintenance mode a couple of hours . More than this, you are losing a lot of valuable traffic or visitors. If you fail to resolve the issues mentioned above, the following are recommended:
1.) Write down the errors reported or some lost functionality of your site after the upgrade. You will report these errors to the appropriate developers or in the WordPress forums.
Make sure you list all of them. If you are not sure , be sure to test your site throughly while in the maintenance mode and jot down all the unresolve problems. Copy and paste these errors to a notepad or you can also take some screenshots.
2.) While in the maintenance mode, download the old version of WordPress that you are using before the upgrade. You can find download it here (don’t select the beta versions).
3.) Upload the core files of the old WordPress version back to your WordPress server.
4.) Restore the old database by following this tutorial.
5.) With the core files using the old WordPress version as well as the old database restored, clear your browser cache and re-check your site. It should be back to normal.
6.) Remove the 503 status by deleting the 503.php and removing the corresponding lines on the .htaccess. This will make your website accessible again to the public.
7.) Report all unfixed issues to the WordPress support forums or finding the developers of the themes/plug-ins affected.
8.) If solutions and code updates are provided by the support or from the developers, follow the above steps again (securing backup ,bringing your site to maintenance mode, etc.) before implementing the updated scripts. Finally you site should be running stable in the latest WordPress version. Good luck!
