As a Linux administrator, you’ve got various tools to use to configure your network connections, such as nmtui, your NetworkManager with GNOME graphical user interface, and of course nmcli (network manager command line tool).
I have observed many administrators using nmtui for its simplicity. However, using nmcli saves you time, boosts your confidence, allows integration into scripts, and is the primary tool for troubleshooting Linux server networking, swiftly restoring its functionality.
Having noticed numerous comments seeking help with nmcli, I decided to write this article. Of course, you should always read the man pages carefully (they are the No. 1 resource for you). My aim is to save you time and provide you with some helpful hints.
nmcli Command Syntax
The syntax of nmcli is:
nmcli [OPTIONS] OBJECT {COMMAND | help}
Where OBJECT is one of general, networking, radio, connection, device, and agent.
Check Network Device Status in Linux
A good starting point would be to check our devices:
nmcli dev status DEVICE TYPE STATE CONNECTION docker0 bridge connected docker0 virbr0 bridge connected virbr0 enp0s3 ethernet connected enp0s3 virbr0-nic ethernet disconnected -- lo loopback unmanaged --
As we can see in the first column, there is a list of our network devices. We have one network card with the name enp0s3. On your machine, you may see different names.
The naming depends on the type of the network card (whether it is onboard, a PCI card, etc.). In the last column, we see our configuration files, which are used by our devices to connect to the network
It is simple to understand that our devices, by themselves, can do nothing. They need us to create a configuration file to instruct them on how to achieve network connectivity. These files are also called ‘connection profiles‘ and we find them in the /etc/sysconfig/network-scripts directory.
cd /etc/sysconfig/network-scripts/
ls
Sample Output
ifcfg-enp0s3 ifdown-isdn ifup ifup-plip ifup-tunnel
ifcfg-lo ifdown-post ifup-aliases ifup-plusb ifup-wireless
ifdown ifdown-ppp ifup-bnep ifup-post init.ipv6-global
ifdown-bnep ifdown-routes ifup-eth ifup-ppp network-functions
ifdown-eth ifdown-sit ifup-ib ifup-routes network-functions-ipv6
ifdown-ib ifdown-Team ifup-ippp ifup-sit
ifdown-ippp ifdown-TeamPort ifup-ipv6 ifup-Team
ifdown-ipv6 ifdown-tunnel ifup-isdn ifup-TeamPort
As you can see here, the files with names starting with 'ifcfg-' (interface configuration) are connection profiles. When we create a new connection or modify an existing one with nmcli or nmtui, the results are saved here as connection profiles.
Ι ‘ll show you two of them from my machine, one with a dhcp configuration and one with static ip.
cat ifcfg-static1
cat ifcfg-Myoffice1
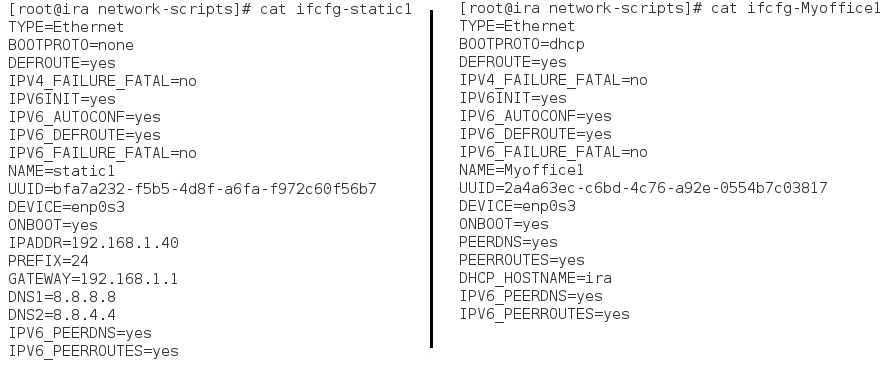
We realize that some properties have different values, and some others don’t exist if they aren’t necessary.
Let’s take a quick look at the most important ones.
TYPE– we have the Ethernet type here. We could also have WiFi, team, bond, and others.DEVICE– the name of the network device associated with this profile.BOOTPROTO– if it has the value “dhcp”, then our connection profile obtains a dynamic IP from the DHCP server. If it has the value “none”, then it does not use a dynamic IP, and we likely assign a static IP.IPADDR– is the static IP we assign to our profile.PREFIX– the subnet mask. A value of 24 means 255.255.255.0. You can better understand the subnet mask by writing down its binary format. For example, values of 16, 24, and 26 mean that the first 16, 24, or 26 bits, respectively, are set to 1, and the rest are 0. This defines the network address and the range of IP addresses that can be assigned.GATEWAY– the gateway IP.DNS1,DNS2– two dns servers we want to use.ONBOOT– if it has the value “yes” it means, that on boot our computer will read this profile and try to assign it to its device.
Check Network Connection in Linux
Now, let’s move on and check our connections:
nmcli con show

The last column of devices helps us understand which connection is ‘UP‘ and running and which is not. In the above image, you can see the two active connections: Myoffice1 and enp0s8.
Hint: If you want to see only the active connections, type:
nmcli con show -a
Hint: You can use the auto-complete hitting Tab when you use nmcli, but is better to use minimal format of the command.
Thus, the following commands are equal:
nmcli connection show
nmcli con show
nmcli c s
Check IP Address in Linux
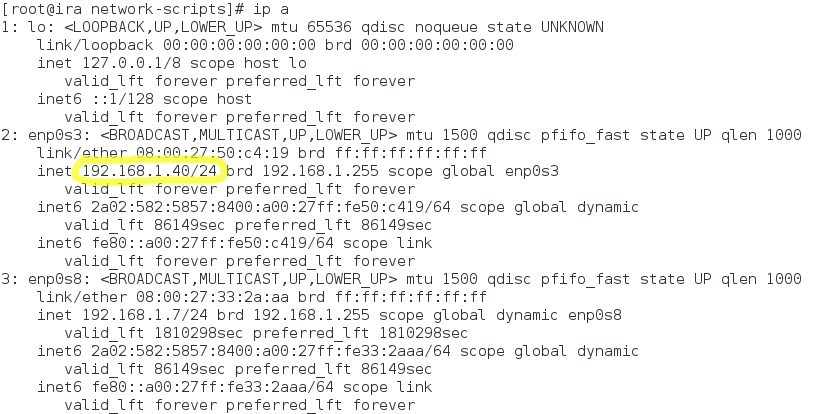
If I check the ip addresses of my devices:
ip a
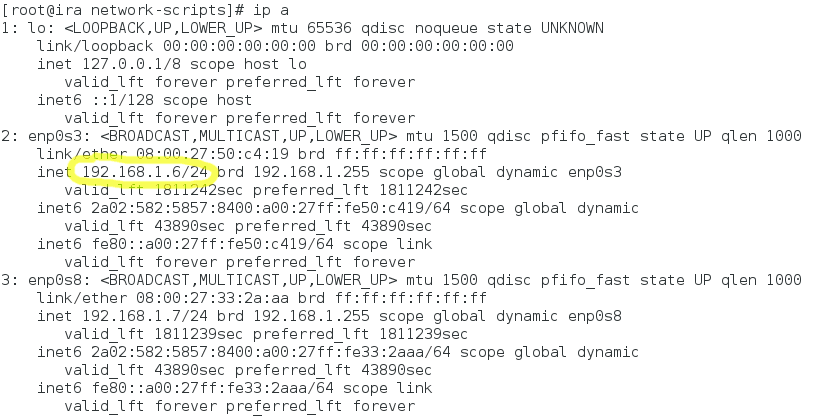
I see that my device enp0s3 took the 192.168.1.6 IP from the dhcp server because the connection profile Myoffice1 which is up has a dhcp configuration.
If I bring “up” my connection profile with name static1 then my device will take the static IP 192.168.1.40 as it is defined in the connection profile.
nmcli con down Myoffice1 ; nmcli con up static1
nmcli con show
Let’s see the IP address again:
ip a
We can make our first connection profile. The minimum properties we must define are type, ifname, and con-name:
type– for the type of connection.ifname– for the device name that is assigned to our connection.con-name– for the connection name.
Creating a New Ethernet Connection in Linux
Let’s make a new ethernet connection with the name Myhome1, assigned to a device enp0s3:
nmcli con add type ethernet con-name Myhome1 ifname enp0s3
Check its configuration:
cat ifcfg-Myhome1
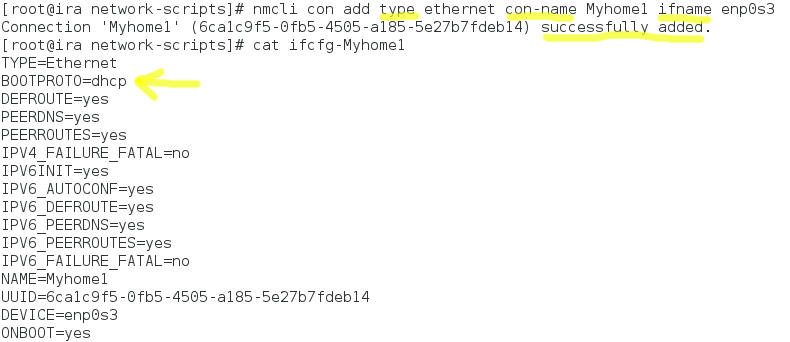
As you can see it has BOOTPROTO=dhcp, because we didn’t give any static ip address.
Hint: We can modify any connection with the “nmcli con mod“ command. However, if you modify a dhcp connection and change it to static don’t forget to change it “ipv4.method” from “auto” to “manual”. Otherwise, you will end up with two IP addresses: one from the dhcp server and the static one.
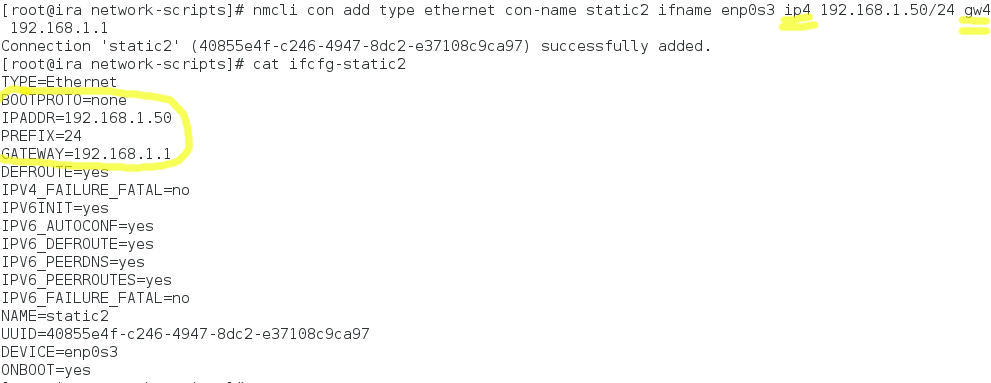
Let’s make a new Ethernet connection profile with a name static2, which will be assigned to a device enp0s3, with static IP 192.168.1.50, subnet mask 255.255.255.0=24, and gateway 192.168.1.1.
nmcli con add type ethernet con-name static2 ifname enp0s3 ip4 192.168.1.50/24 gw4 192.168.1.1
Check its configuration:
cat ifcfg-static2
Modify DNS Servers in Linux
Let’s modify the last connection profile and add two dns servers.
nmcli con mod static2 ipv4.dns “8.8.8.8 8.8.4.4”
Hint: There is something here you must pay attention to: the properties for IP address and gateway have different names when you add and when you modify a connection. When you add connections you use “ip4” and “gw4”, while when you modify them you use “ipv4” and “gwv4”.
Bring Up Ethernet Connection in Linux
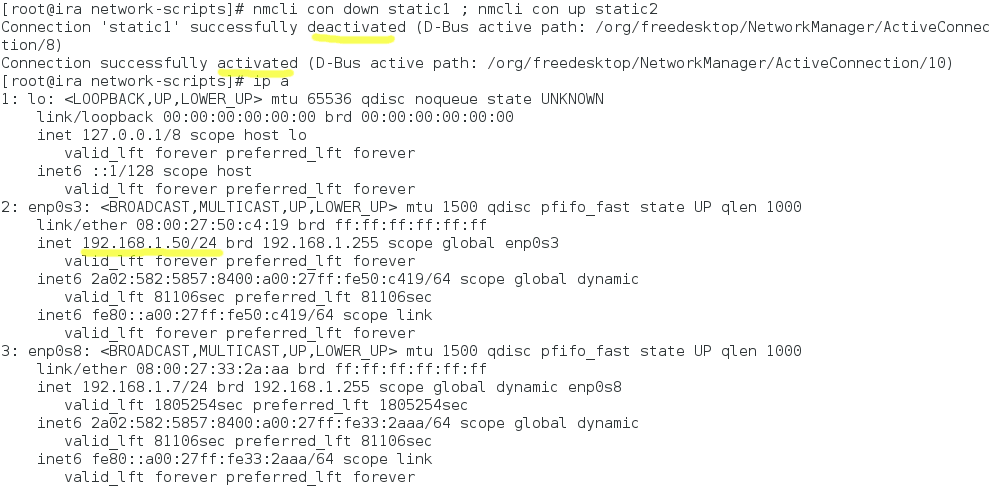
Now let’s bring up this connection profile:
nmcli con down static1 ; nmcli con up static2
As you can see, the device enp0s3 now has an IP address of 192.168.1.50.
ip a
Hint: There are a lot of properties you can modify. If you don’t remember them by heart you can help yourself by typing “nmcli con show” and after that the connection name:
nmcli con show static2

You can modify all these properties written in lowercase.
For example: when you bring down a connection profile, the NetworkManager searches for another connection profile and brings it up automatically. (I leave it as an exercise to check it). If you don’t want your connection profile to auto-connect:
nmcli con mod static2 connection.autoconnect no
The last exercise is very useful: you made a connection profile but you want it to be used by specific users. It’s good to classify your users!
Set Ethernet Connection Permissions to User in Linux
We let only user stella use this profile:
nmcli con mod static2 connection.permissions stella
Hint: If you want to give permissions to more than one user, you must type user:user1,user2 without blank space between them:
nmcli con mod static2 connection.permissions user:stella,john
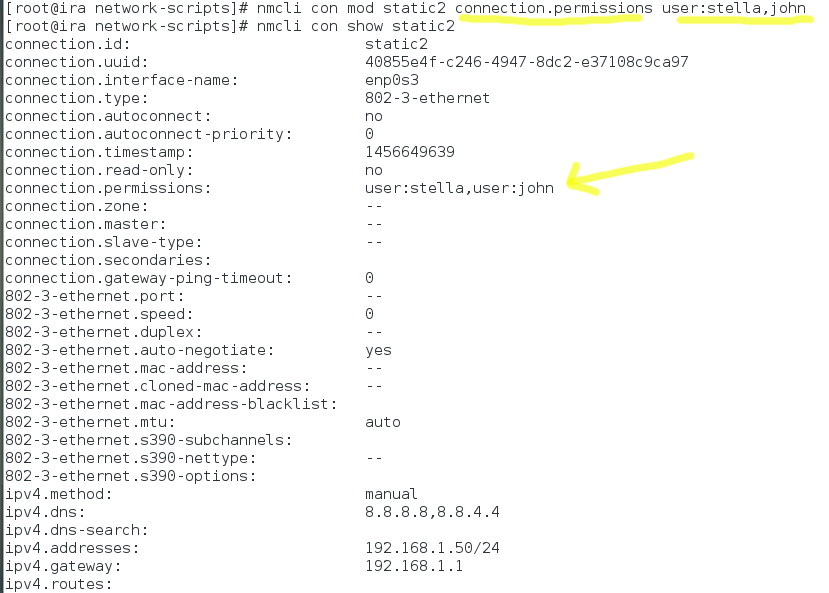
If you log in as another user you can’t bring “up” this connection profile:
nmcli con show
nmcli con up static2
ls /etc/sysconfig/network-scripts

An error message says that connection ‘static2’ does not exist, even if we see that it exists. That’s because a current user has no permission to bring up this connection.
Conclusion: don’t hesitate to use nmcli. It’s easy and helpful.
