SSH, an acronym for Secure Shell, is a remote network protocol that is used to securely connect to remote devices such as servers and network devices over a TCP/IP network.
It is a cryptographic network protocol that provides strong encryption technologies and hashing to secure communication between two devices on a network.
SSH uses two main authentication methods: password authentication and public key authentication. With password authentication, a user provides the remote host’s IP address or FQDN (Fully Qualified Domain Name) and password to authenticate.
Public key authentication uses an SSH key pair for authentication, which comprises two SSH keys: private and public keys.
The private key resides on the user’s machine and should always be kept confidential and secure. The public key is saved on the remote host that a user connects to. During authentication, the identity of the two keys is compared and access is granted.
When connecting to a remote system via SSH, you might encounter the error Client_loop: send disconnect: Broken pipe.
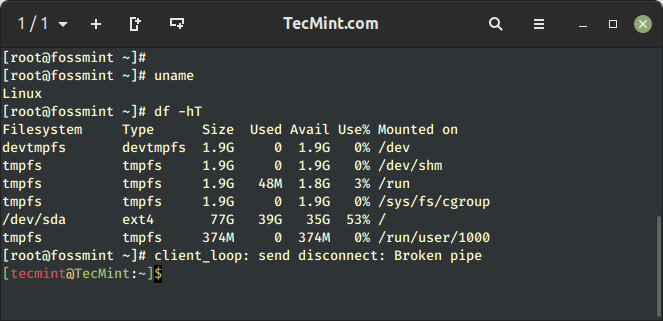
In this tutorial, we will see why this happens and address the error.
Client_loop: send disconnect: Broken pipe Error
The error is simply a disconnection message that notifies you that your SSH connection timeout has been exceeded.
This is a period of inactivity during which no Linux command is executed or issued from the client side. When this happens, the SSH session is terminated, effectively disconnecting you from the remote server.
Most users will usually press ‘ENTER’ or a key on the keyboard to avoid having an idle SSH session which will cause the disconnection to the host. However, this can tedious and time-wasting.
Thankfully, SSH default configuration settings provide a few parameters that you can configure to keep your SSH connections active for longer periods of time.
Fix Client_loop: send disconnect: Broken pipe Error
To resolve this issue, you need to increase the SSH connection timeout on the client. To do so, modify the default SSH configuration file which is usually at /etc/ssh/sshd_config.
$ sudo vi /etc/ssh/sshd_config
Be sure to locate these two parameters: ClientAliveInterval and ClientAliveCountMax. Let’s check out what they do.
- ClientAliveInterval – This is the period of inactivity after which the SSH server sends an alive message to the remote client that is connected to it.
- ClientAliveCountMax – This is the number of attempts that the server will make to send the alive message from the server to the client.
We will set the two values as follows:
ClientAliveInterval	300
ClientAliveCountMax	3
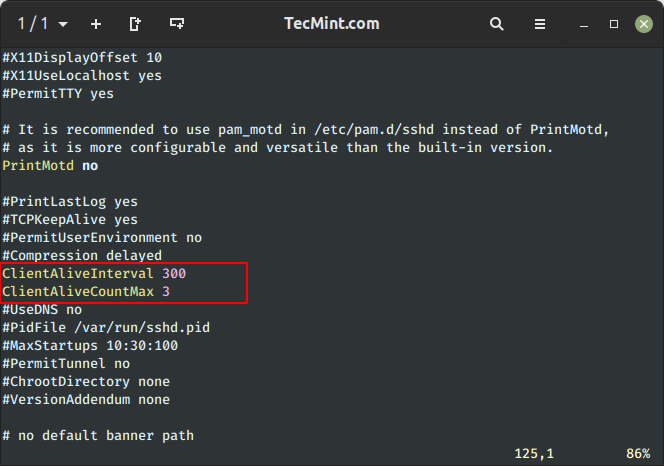
This means that after the first 300 seconds (5 minutes) of inactivity from the client, the server will send an alive message to the client to keep the SSH session active.
If no data or response is received from the client for the next 300 seconds (at the 600-second mark), the server will again send another alive message. Finally, after 900 seconds of inactivity from the client, the SSH connection will be terminated or dropped.
Be sure to save the changes made to the file and then exit. Then restart the SSH daemon.
$ sudo systemctl restart sshd
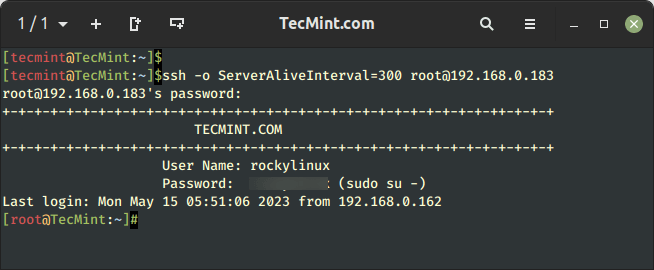
Alternatively, you can connect to your remote client Linux system by specifying the ServerAliveInterval parameter in seconds (300 seconds), which means your SSH session is active for up to 5 minutes.
$ ssh -o ServerAliveInterval=300 [email protected]_ip_address
In this tutorial, we demonstrated how to resolve the Client_loop: send disconnect: Broken pipe error. As you have seen all you need is to perform a few tweaks in the SSH configuration file.
