The following post emphasizes on another WordPress fix that has been encountered by many of you – “Failed to Load Resource”. Being easy to use the platform it isn’t necessary to assume that all the WordPress users are technically sound. Many non-tech professionals find it challenging to figure out what resource or file is not loading, and more importantly, why?
Honestly speaking, the error is quite hard to fix since it can be caused by several different issues like plugin compatibility issues and HTTPS URL issues and more. Basically, here I am for you to have a look at some of the causes behind this error and provide a few possible solutions for fixing it. Now for those who have never been acquainted with ‘Failed to Load Resource” Error – we all know that WordPress systems, Plugins, themes run on PHP scripts which automatically send requests to communicate with the resources stored on your server. When something interferes with these requests, the platform fails to fetch the resources. This is when you usually encounter issues such as the “Failed to Load Resource” error.
Let’s say for example, if the browser is unable to load a specific file, then it would go on to display the page without that file. Further, the browser will add a notice in the error console for debugging purposes.
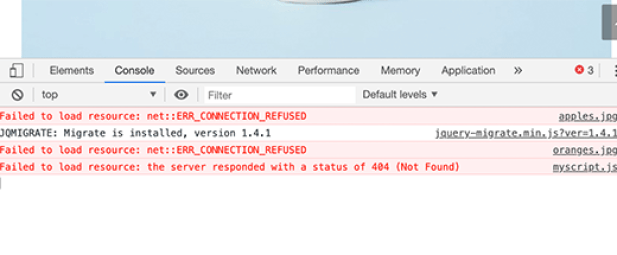
- Failed to load resource net::ERR_CONNECTION_REFUSED
- Failed to load resource: the server responded with a status of 404 (Not Found)
- Failed to load resource: the server responded with a status of 500 (Internal Server Error)
- Failed to load resource: net::err_name_not_resolved
In case, if the specific file failed to load, the rest of your webpage will continue to load. Chances are pretty much high that it may look or behave as expected. It’s time to get it fixed so that you can avoid unexpected issues.
#1 Replace The Missing Resource
Let start with the basics first! One of the most common reasons found. The missing resource is an image in one of your blog posts or page, then try to look for it in the media library. If you are able to see the media library, then try to add again by editing the post or page. If you cannot see the file in the media library, then try uploading it again. There might be cases when you see broken images or empty boxes in the media library instead of images. In that case, you may need to fix the file permissions. For detailed instructions, see our tutorial on how to fix image upload issues in WordPress.
#2 Replace theme or plugin files
In case, if the failed resource is a WordPress plugin or theme file, then the easiest way to replace it is by reinstalling the plugin or theme. First, you need to deactivate your current WordPress theme. All you have to do is visit the Appearance » Themes page.
In case, if you decide not to activate the theme installed on your website, then you can just go ahead and activate that. This will deactivate your current theme. In case you don’t have any other theme installed, then you need to install a default theme. As soon as you activate the other theme, you can visit your website to see the error has been resolved or not. In case, if the missing resource is a WordPress plugin file then you will need to reinstall the plugin. It may also interest you to know that you can use FTP to connect to your WordPress hosting account and manually replace a specific file. For more details, see our guide on how to use FTP.
#3 Fixing the URL
Last but certainly not the least is the failed resource error is incorrect WordPress URL settings. So what you need to do is Settings » General page and look for WordPress Address and Site Address options.
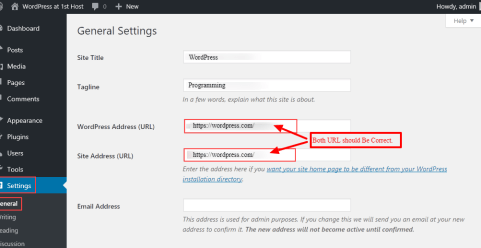
Here you need to make sure that both the URL are correct and you need to have the same URLs for both options. Always keep this in mind that WordPress treats www and non-www URLs as two different addresses. If you have SSL enabled on your website, then your URLs should begin with https instead of HTTP.

