Just about every website uses images. They can be an integral part of your site’s design, a complement to your content, or just there because you want them to be. The problem is, the more high quality your images are, the more space they occupy, and the longer they take to load. This can be a huge problem as a slow website can cause you to lose traffic and revenue.
Fortunately, it’s possible to avoid this by optimizing your images for WordPress. This is a process that involves picking the right file types and compressing your images without affecting their quality. Doing this will enable you to carry on using images on your site, while still keeping your loading times lean.
In this article, we’re going to talk about how to choose the perfect image formats and compress your images. We’ll also discuss how to resize and crop your images for the best results. Finally, we’ll show you how you can improve your images’ Search Engine Optimization (SEO). Let’s get to work!
Why You Need to Learn How to Optimize Your Images for WordPress
When we talk about optimizing images for WordPress, we’re referring to various metrics, the most important of which is speed. If your images take up too much space, your pages will be too slow to load. However, there’s a direct correlation between image size and their quality. The more detail a picture includes, the larger the file is.
However, there are ways to optimize or ‘compress’ images, so they don’t weight as much without compromising image quality. This is known as ‘lossless’ compression. There are also ‘lossy’ compression techniques, which produces even smaller files but will affect the quality slightly, although rarely enough to be noticeable. Most importantly, it’s hard to notice the difference between the original version of an image and its compressed counterpart.
If you blew the picture up to its full size, the differences would be more evident. However, on a website, you can get away with lossy compression for better results. There are several advantages to compressed images, including:
Studies have also shown that long loading times can impact conversions. That’s why it’s critical for you to measure loading times often and seek to optimize them however possible. Naturally, there are several other ways to improve your site’s speed beyond optimizing your images. For example, you can use a free Content Delivery Network (CDN) to store your images, such as the one offered by Jetpack, which can drastically improve load times.
How to Optimize Your Images for WordPress (5 Methods)
Compressing your images so they take up less space is rather simple, with or without WordPress. With that in mind, this section will also guide you through other ways to optimize your images, not just for speed, but so they look better and help with your SEO. For the best possible results, we recommend that you use all five methods together.
1. Choose the Right Image File Formats
There are dozens of file formats you can choose for your images. On the web, some of the most common include JPEG, PNG, GIF, and vector files, such as those using the SVG format.
In most cases, you’ll want to stick to a single file format for the sake of convenience. That means you need to find whichever one provides the highest level of quality at the smallest possible size. The two most common picks are JPEG and PNG files. You’ve most certainly run into both formats hundreds or thousands of times on the web, but here are two examples to give you an idea. Here’s an image using the JPEG format:
Now here’s that same image saved as a PNG:
Technically, PNGs provide a higher level of quality, so they tend to weight more. However, that degree of quality is hard to appreciate when you scale images down for the web. With that in mind, here’s when we recommend you use either format:
- JPEG: This format is perfect for websites that don’t need to display images at full resolution. JPEG images can be compressed further than their PNG counterparts, so you get more savings when it comes to space without a noticeable loss in quality.
- PNG: If your website uses galleries, for examples, and you want to display images at full resolution with little loss of quality, you’ll want to use PNG. This can impact your site’s loading times, so you’ll need to look for ways to improve them beyond image compression.
Now, you may also want to use GIFs in some situations. WordPress enables you to upload GIFs to your pages, but they tend to be rather heavy. As such, you should only use them when it’s necessary to display an animation. In those cases, though, you may also want to look into using animated SVG files, which are much lighter alternatives (and they scale better).
2. Compress Your Images
Once you’ve chosen which type of images to use on your website, you’ll need to set up a process for compressing them. Since you’re using WordPress, there are two ways you can do this. The first one involves optimizing your images manually, using an online tool such as TinyPNG, which also works with JPEGs:

With this type of service, you upload the images you want to compress and then download their post-optimization versions. Afterward, you still need to upload them to WordPress, though, so it’s not very efficient if you use a lot of images on your website.
That’s why, in most cases, we recommend you set up an image optimization plugin such as WP Smush. This one is our favorite because it’s very simple to set up:

Once you install and activate the plugin, you’ll see a welcome screen, asking whether you want it to optimize your images automatically when you upload them:
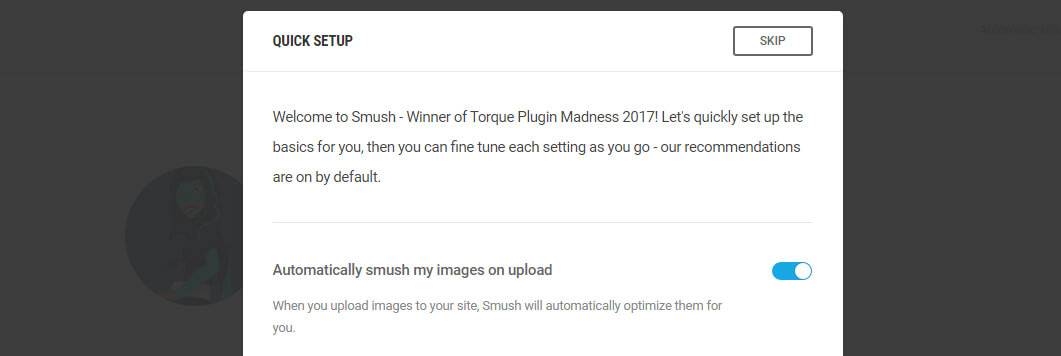
That setting is turned on by default, so let’s keep it that way. If you want to optimize your images further, you can also instruct WP Smush to strip their EXIF data and resize them upon upload:
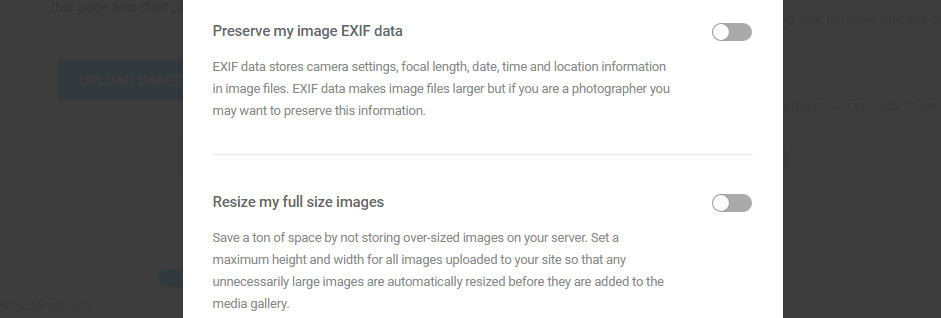
We’ll talk more about how image resizing affects your files later. However, we recommend you enable this setting if you want to get the most out of the plugin. As for whether to strip EXIF data or not, that’s up to you, but it shouldn’t be a problem if you keep a backup of your pictures.
Now, you’ll jump to Smush’s own hub, which you can access from your dashboard’s Smush tab. Here, you can keep track of how many images WP Smush has optimized and how much space you’ve saved:
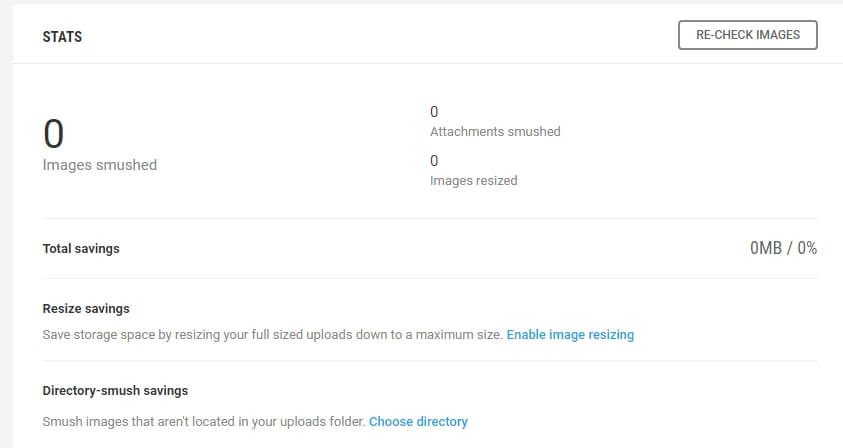
WP Smush is a very hands-off plugin. You’ll see a message about it optimizing your images when you upload them, but aside from that, you can just set it up and forget about it.
Keep in mind – there are plenty of other plugins that can help you optimize images for WordPress. For example, two of our other favorites include ShortPixel Image Optimizer and EWWW Image Optimizer. Both are about as powerful and also feature user-friendly interfaces. Which one you choose depends largely on your own preference.
Finally, while the basic version of WP Smush is free, it also has some limitations. For example, it only enables you to optimize images that weight up to 1 MB. In our experience, that’s more than enough in most cases, but if you want extra features (such as larger maximum sizes), it might be worth upgrading to WP Smush Pro.
3. Resize Your Images for Optimal Display
As we mentioned earlier, you very rarely need to display your images in their full size on your website. For example, blog posts rarely need to use full-size images since they can easily overpower the text and make it harder to read.
The point is, it doesn’t make much sense to upload images using their full resolution if you’re not going to take advantage of it. After all, the higher the resolution, the more they will weight. That means, to fully optimize images for WordPress, you need to both compress and resize them.
As you’ll probably remember from the last section, the WP Smush plugin includes an option to resize your images automatically. This can be very helpful as it the manual approach requires you to resize images one by one, which can be quite time-consuming. To do it, you’d have to access your WordPress media library, click on the image you want to resize, and then on the Edit Image button:
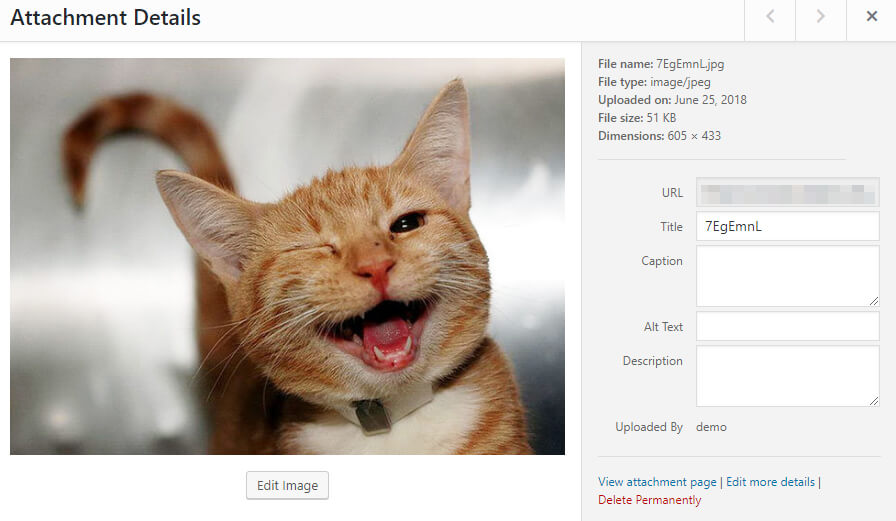
Now you can scale down your image using the Scale Image menu to the right. It’s a simple process, but it’s much smarter to automate things like this when possible. For example, using the WP Smush plugin, you can go into the Smush tab, then move to the Settings section and find the Full size images option. If you enable the setting, the plugin will let you choose the maximum resolution for the images you upload:

The resolution you choose here should depend largely on your website’s design. Think about what settings you want to use and then update this option. This way, your images will be automatically resized when uploaded and you won’t be stuck with unnecessarily huge images weighing down your site.
4. Ensure That Your Images Are Neatly Cropped
Resizing your images is a smart move, but you’ll sometimes need to display images whose dimensions are too large for the sections where you want to display them. For example, you might want to show a screenshot of the full WordPress dashboard to illustrate a feature:

However, that image might look too small if you’ve resized it to fit without your blog’s formatting. Instead of having you open it in another window, a better option would be to crop the image so it only shows the area you want to focus on.
Cropping is a simple way to resize your images even further and to narrow focus on the elements you want to highlight. Naturally, you shouldn’t be cropping every image on your blog just for the sake of it, but it can be helpful to optimize images and improve your site’s readability in certain cases.
Almost every image editing software offers cropping features. However, if you don’t have access to any, you can use WordPress’ built-in cropping mechanism. To access it, go to your media library and click on the image you want to edit. Once it opens, select the Edit Image option:

On the next screen, drag your mouse to highlight the section of the image you want to crop:
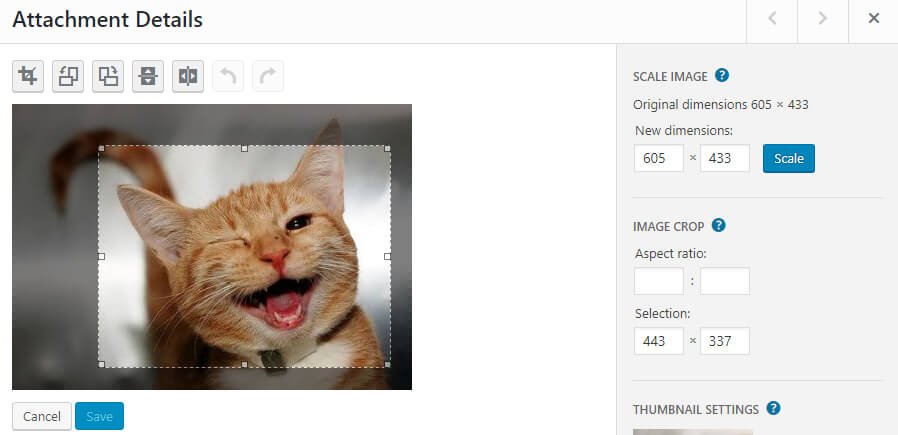
Once you have done that you can click on the cropping button at the top left of the menu, above the screen. Most other image editing tools also use a similar icon, so it’s worth remembering what it looks like for future reference.
WordPress will now show your updated image, and you’ll have the option to save the changes or cancel them. Just click on the Save button if you’re happy and that’s it. You just learned how to optimize images for WordPress by cropping them!
5. Work on Your Images’ SEO
So far, we’ve focused only on reducing the file sizes of your images as much as possible. However, that’s not the only way you can optimize images for WordPress. For example, you can also edit your images’ metadata for SEO purposes.
By metadata, we mean your images’ title and alt text. Search engines can access that data to help them figure out what your images are (since they can’t see them). Technically, adding descriptive metadata to your images is a way of optimizing them since it can also improve your search engine results.
The first thing you want to keep in mind is to give descriptive titles to your images. For example, if you upload a picture of a red flower, you should call it something such as red-flower.jpeg instead of image4523.jpeg. Just be descriptive without going overboard and try to keep image names to four words or less, so the file names don’t get too long.
As for alt text, that’s the information that images display when you mouse over them, and it should also describe their contents. To edit your image’s alt text, upload them to WordPress first, then go to your media library and pick the image you want to edit. You’ll see a section to the right, including your image’s title, URL, and the option to edit its Alt Text:
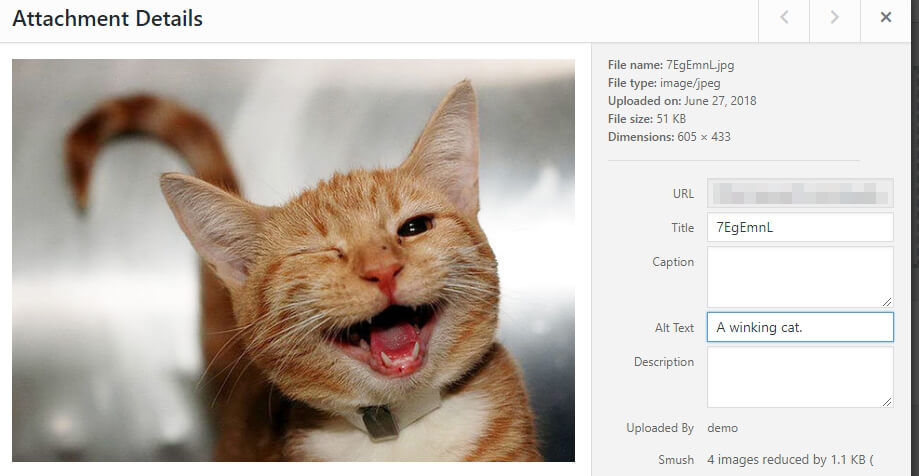
The same rules as with titles apply here. You want to be descriptive without overdoing it, so don’t include a full paragraph describing everything in excessive detail – just break down what you can see in a sentence or two.
When you upload images to WordPress, you can edit their alt text right away. This can save you a lot of time, since you may otherwise need to dig through your media library at a later date to add the metadata, which is an unnecessary hassle.
Conclusion
In most cases, you want to use the best-looking images you can on your website. However, high-quality pictures take up a lot of space, which is why its important that you know how to optimize images for WordPress. Optimizing your images won’t just improve your loading times, but you may even get a boost to your website’s SEO. All of this is much simpler if you’re using WordPress since you have access to powerful image optimization plugins such as WP Smush.
In this article, we’ve shown you how to best optimize your WordPress images by using the following steps:
- Choose the right image file formats.
- Compress your images.
- Resize your images for optimal display.
- Ensure that your images are neatly cropped.
- Work on your images’ SEO.
Do you have any questions about how to optimize images for WordPress? Let’s talk about them in the comments section below!
Image credit: Pixabay.
