If you are a Linux system administrator, time will come when you will need to configure networking on your system. Unlike desktop machines where you can use dynamic IP addresses, on a server infrastructure, you will need to setup a static IP address (at least in most cases).
Read Also: How to Set or Change System Hostname in Linux</p
This article is meant to show you how to configure static IP address on most frequently used Linux distributions.
For the purpose of this tutorial, we will use the following Internet Protocol version 4 (IPv4) details:
IP address: 192.168.0.100
Netmask: 255.255.255.0
Hostname: node01.tecmint.com
Domain name: tecmint.com
Gateway: 192.168.0.1
DNS Server 1: 8.8.8.8
DNS Server 2: 4.4.4.4
Configure Static IP Address in RHEL/CentOS/Fedora:
To configure static IP address in RHEL / CentOS / Fedora, you will need to edit:
/etc/sysconfig/network
/etc/sysconfig/network-scripts/ifcfg-eth0
Where in the above "ifcfg-eth0" answers to your network interface eth0. If your interface is named “eth1" then the file that you will need to edit is "ifcfg-eth1".
Let’s start with the first file:
# vi /etc/sysconfig/network
Open that file and set:
NETWORKING=yes
HOSTNAME=node01.tecmint.com
GATEWAY=192.168.0.1
NETWORKING_IPV6=no
IPV6INIT=no
Next open:
# vi /etc/sysconfig/network-scripts/ifcfg-eth0
Note: Make sure to open the file corresponding to your network interface. You can find your network interface name with ifconfig -a command.
In that file make the following changes:
DEVICE="eth0"
BOOTPROTO="static"
DNS1="8.8.8.8"
DNS2="4.4.4.4"
GATEWAY="192.168.0.1"
HOSTNAME="node01.tecmint.com"
HWADDR="00:19:99:A4:46:AB"
IPADDR="192.68.0.100"
NETMASK="255.255.255.0"
NM_CONTROLLED="yes"
ONBOOT="yes"
TYPE="Ethernet"
UUID="8105c095-799b-4f5a-a445-c6d7c3681f07"
You will only need to edit the settings for:
- DNS1 and DNS2
- GATEWAY
- HOSTNAME
- NETMASK
- IPADDR
Other settings should have already been predefined.
Next edit resolve.conf file by opening it with a text editor such as nano or vi:
# vi /etc/resolv.conf
nameserver 8.8.8.8 # Replace with your nameserver ip
nameserver 4.4.4.4 # Replace with your nameserver ip
Once you have made your changes restart the networking with:
# /etc/init.d/network restart [On SysVinit]
# systemctl restart network [On SystemD]
Set Static IP Address in Debian / Ubuntu
To setup static IP address in Debian/ Ubuntu, open the following file:
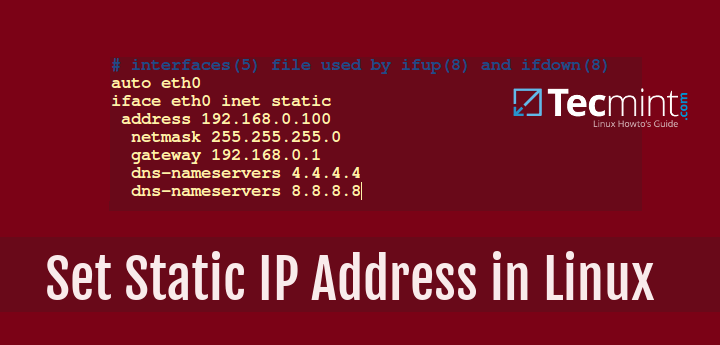
# nano /etc/network/interfaces
You may see a line looking like this:
auto eth0
iface eth0 inet dhcp
Change it so it looks like this:
auto eth0
iface eth0 inet static address 192.168.0.100 netmask 255.255.255.0 gateway 192.168.0.1 dns-nameservers 4.4.4.4 dns-nameservers 8.8.8.8
Save the file and then edit /etc/resolv.conf like this:
# nano /etc/resolv.conf
nameserver 8.8.8.8 # Replace with your nameserver ip
nameserver 4.4.4.4 # Replace with your nameserver ip
Restart the networking on your system with:
# /etc/init.d/network restart [On SysVinit]
# systemctl restart network [On SystemD]
Your static IP address has been configured.
Conclusion:
You now know how to configure a static IP address on a Linux distro. If you have any questions or comments, please do not hesitate to submit them in the comment section below.


