This is a very useful tutorial for WordPress and Ubuntu beginners that are planning to install WordPress in a local host LAMPP (Linux/Apache/MySQL/PHP) server.
This is not using XAMPP or WAMP solution that is common to developers using Windows operating system. This tutorial will illustrate the standard approach of building a LAMPP server in Ubuntu and running WordPress on it. The steps in this tutorial might also work in other similar Linux distribution such as Mint.
Developing a WordPress website in a Linux environment is beneficial since majority of deployed servers for WordPress will also be running in Linux. This will have some benefits in terms of operating system compatibility.
Start Installing the LAMPP server
Before proceeding to the proper installation steps. This tutorial is written using the following:
a.) Ubuntu 12.04 LTS – updated with the latest packages. This is also the latest version as of July 2012.
b.) WordPress 3.4.1– this is the latest version of WordPress as of July 2012 first week.
If you are planning to install Ubuntu or WordPress software in your computer, it is highly recommended to use the latest version for stability and security. It is recommended to upgrade your Ubuntu to use the latest version to ensure that this tutorial will be compatible with your results.
Step 1
Login as root, type this command in the terminal and enter your Ubuntu password. You can launch the terminal command line by pressing Control- ALT- T:
sudo -s -H
Step 2
The first thing to install is the MySQL server. Enter this command:
apt-get install mysql-server mysql-client
It will start downloading packages, so you have to wait. Then you will be required to enter your MySQL root password. Make sure you will remember this as you will be using this during WordPress installation. The username will default to “root”.
Step 3
The next thing to install will be Apache. This is your web server. Type the command below:
apt-get install apache2
Step 4
You will then need to install PHP. This is the server scripting language used by WordPress. Enter this command:
apt-get install php5 libapache2-mod-php5
Step 5
After installing PHP, you need to restart the Apache server by entering this command:
/etc/init.d/apache2 restart
Step 6
It is highly recommended to use your Ubuntu home directory (.e.g /home/codex-m/www) as your document root so that you can easily read and write files.
Document root is where you will be placing the WordPress files for installation, editing and management. This will make your WordPress development work easy as you will have full permission to edit those files without requiring root access.
So in the command prompt, navigate to your Ubuntu home directory by entering the command:
cd /home/your_Ubuntu_username
Replace “your_Ubuntu_username” with your correct username. To make sure you are now in your Ubuntu home directory, type this command:
pwd
It should return:
/home/your_Ubuntu_username
Step 7
Create a www folder in your home directory by entering this command:
mkdir www
Step 8
It is time to assign proper file permissions to document root folder that will be used by Apache and WordPress. First, change the CHMOD of your www folder to 755:
chmod -R 755 www
This will make the www folder readable/writable by Apache which is important. The additional parameter -R means that all files/folders inside the folder (e.g. your WordPress files) will get that permission as well.
Step 9
Next, you need to ensure that Apache has permissions to read and write your home directory. Enter this command:
chmod 755 /home/your_Ubuntu_username
After that, also enter this command:
chmod 755 /home/
The main purpose of doing this is to prevent 403 forbidden errors in Apache when accessing your WordPress website or any HTML/PHP files after changing your document root in Step10.
Step 10
Confirm that you have correctly set permissions by running the following set of commands:
a.) Check if your www directory is now using 755 as the permission:
stat -c '%a' /home/your_Ubuntu_username/www
You should see 755 as the return value.
b.) Check if your home directory is using 755:
stat -c '%a' /home/your_Ubuntu_username/
And also this command:
stat -c '%a' /home/
Step 11
By default (after Apache installation in Step3); the document root of Apache accessible by the web browser is found in this path:
/var/www
In the previous steps, you have changed it to use your Ubuntu home directory such that the new path will be:
/home/your_Ubuntu_username/www
This new path is now configured with proper file permissions that Apache can access. Finally, you need to configure your Apache configuration to use this new path. Follow the steps below carefully and make sure you are still logged-in as root:
a.) Open the enabled sites configuration in Apache using the terminal:
pico /etc/apache2/sites-enabled/000-default
The text editor should look like this:
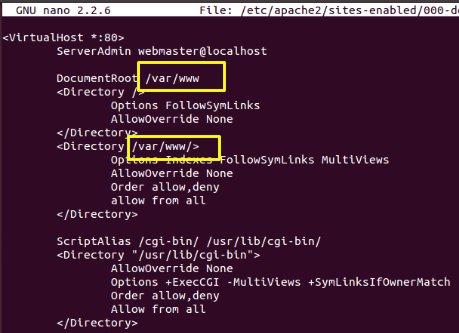
b.) Change the two instances of /var/www to use your new document root path found in your Ubuntu home directory. For example this is the edited version:
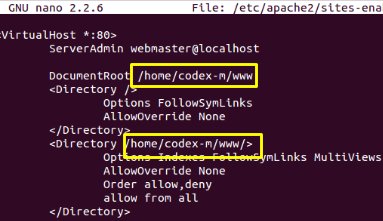
You need to be careful not to change any of the existing lines or code. To save the changes; press Control – O then press enter. To exit the editor, press Control – X.
Step 12
Restart Apache:
/etc/init.d/apache2 restart
Step 13
WordPress will be using a lot of PHP modules for proper operation. You should also install these modules. Copy and paste the command below to the terminal:
apt-get install php5-mysql php5-curl php5-gd php5-intl php-pear php5-imagick php5-imap php5-mcrypt php5-memcache php5-ming php5-ps php5-pspell php5-recode php5-snmp php5-sqlite php5-tidy php5-xmlrpc php5-xsl
Step 14
Restart Apache again:
/etc/init.d/apache2 restart
Step 15
Using your favorite code editor (gedit will do), create a PHP file called as info.php containing the following code to test your Apache and MySQL installation:
<?php
phpinfo();
?>
Save info.php to your document root folder path:
/home/your_Ubuntu_username/www
Step 16
Now access info.php in the web browser by typing this in the address bar:
http://localhost/info.php
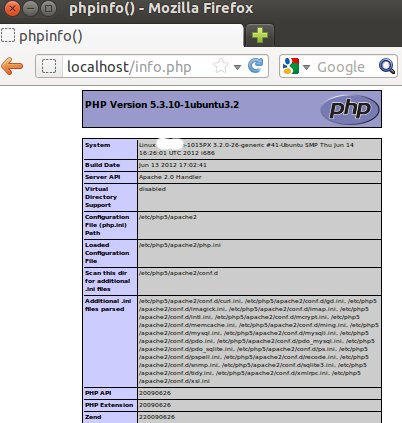
You should be able to see the details of your PHP configuration settings without any errors.

Install WordPress in Ubuntu LAMPP server
With your server running, you can now install WordPress:
Step 1
Launch the terminal then go to your new document root path:
cd /home/your_Ubuntu_username/www
Step 2
Download the latest WordPress version (be patient it can take some time to download depending on the speed of your Internet connection):
wget http://wordpress.org/latest.zip
Step 3
Unzip WordPress:
unzip latest.zip
After unzipping, you should be able to see the WordPress folder in your document root.
Step 4
Connect to MySQL to create the WordPress database. Issue this command in the terminal, replace PASSWORD with your own MySQL root password as configured in the Step2 of the LAMP installation.
mysql -uroot -pPASSWORD -hlocalhost
For example, if your password is MrSmiley then the command to type will be:
mysql -uroot -pMrSmiley -hlocalhost
The username is automatically set to root and the hostname will be localhost. You will be able to see th MySQL prompt after successul login:
mysql>
Step 5
In the MySQL prompt, create the WordPress database by entering this command:
create database wordpress;
The database name will be “wordpress”. You can assign any database name that you like. For example, if you want the database name to be MyWordpressDatabase then enter it as:
create database MyWordpressDatabase;
Step 6
Exit MySQL database:
exit;
Step 7
Go inside your WordPress directory in document root, find the file: wp-config-sample.php. Open it with a text editor and define your MySQL connection parameters. Replace:
define('DB_NAME', 'database_name_here');
/** MySQL database username */
define(‘DB_USER’, ‘username_here’);
/** MySQL database password */
define(‘DB_PASSWORD’, ‘password_here’);
/** MySQL hostname */
define(‘DB_HOST’, ‘localhost’);
With your database connection parameters (replace “Your MYSQL password” with your correct password):
define('DB_NAME', 'wordpress');
/** MySQL database username */
define(‘DB_USER’, ‘root’);
/** MySQL database password */
define(‘DB_PASSWORD’, ‘YOUR MYSQL PASSWORD’);
/** MySQL hostname */
define(‘DB_HOST’, ‘localhost’);
Step 8
Replace:
define('AUTH_KEY', 'put your unique phrase here');
define('SECURE_AUTH_KEY', 'put your unique phrase here');
define('LOGGED_IN_KEY', 'put your unique phrase here');
define('NONCE_KEY', 'put your unique phrase here');
define('AUTH_SALT', 'put your unique phrase here');
define('SECURE_AUTH_SALT', 'put your unique phrase here');
define('LOGGED_IN_SALT', 'put your unique phrase here');
define('NONCE_SALT', 'put your unique phrase here');
With the output provided in this URL (enter this in the browser):
https://api.wordpress.org/secret-key/1.1/salt/
Step 9
In your text editor, go to File – Save As. Save it as:
wp-config.php
Make sure wp-config.php is found inside your WordPress directory along with index.php.
Step 10
Finally launch the WordPress installation in the web browser by typing this URL:
http://localhost/wordpress/wp-admin/install.php
Follow the rest of the instructions by providing your username, password, email, etc. Then after installation you can login to the WordPress admin panel in this URL:
http://localhost/wordpress/admin
Or view your newly installed WordPress website in this URL:
http://localhost/wordpress/
You have just installed WordPress in Ubuntu using LAMPP localhost server.
