
What is Google Adsense?
Google Adsense is an online advertisement program for advertisers and publishers. Advertisers are those who create ads for their products. Publishers are bloggers or webmasters who publish ads on their blogs or websites. According to a survey, Google has the largest share in online advertisement market (when including Google DoubleClick and Google Adwords along with Google Adsense). According to ProBlogger.net, Google Adsense CPC program is the best revenue supplement for your website, even after the arrival of other ads networks and other ads formats like CPM, CPA, etc. Google Adsense Cost-per-Click (CPC) ads are the best monetization trick when it come to earn from your website/blog. Rates can be as higher as $0.10/click (or more), i.e., a visitor click ads on your site for once and you get $0.10 for that. Isn’t it awesome?
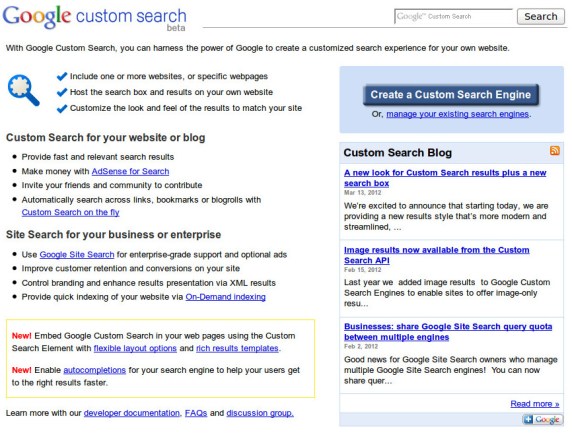
What is Google CSE?
Google Custom Search Engine is what Google offer you it’s search engine technology, which you can use on your website. Google CSE is powerful and customizable to your needs. Some interesting features of Google CSE is that you can include multiple sites to search engine, customize its look & design, image search support, give auto-completions for your users, give ranking to different sites (included in your search engine) and Google CSE will rank different results according to your set defaults. Other useful features are that you can use it in various formats like search bar at one page and search results on another; search bar and results in a page; or you can even opt for Google hosted search results. Google CSE come in two flavors: Custom Search Engine free (with ads to support) and Google Site Search starting at $100/year.
Guidelines to setup Adsense+CSE and increase your Earning potential
Don’t you have Adsense account? Create one!
It’s completely all right if you don’t have a Google Adsense account prior using this tutorial. You can sign up for an Adsense account as discussed below. We would suggest you to use a good ranking website (with good amount of visitors) when signing up for the Adsense account, else there can be chances that your application get rejected. Also, please read Adsense help before applying so that you can check that your site will be accepted by Google Adsense team. Adsense doesn’t accept any illegal or adult sites, along with, many other exceptions. Google pay you by check, mailed to your home address with your name as receiver. So, don’t forget to check the details once (for any pertaining errors) before sending the application.
Steps to sign up for an Adsense account:
- Goto https://www.google.com/adsense
- Click on ‘SIGN UP NOW‘ at top right corner of the page.
- Click ‘Yes, Proceed to Google Account sign in‘ if you’ve a Google account else first create a google account and then follow again from step 3.

- Enter your primary/main website URL in text box labelled ‘I will show ads on:‘ and your site language in ‘Content language‘ option.
- Accept to abide by the Adsense rules & policies by checking the box and then, click Continue.
- Enter the required details like your country, individual/business account type, Payee name, address, phone no., email preferences, etc. and then click ‘Submit Application‘.
- Wait for 1-3 days and you’ll receive an email from Adsense support confirming your Adsense account creation.
- Now, you need to place an ad on your website so that Adsense team can check/review your website that your site content abide by their guidelines.
- So, login to your Adsense account by going to https://www.google.com/adsense/.
- Goto create ads section in your Adsense account and follow its steps to create an ad. Don’t worry about ad placement and size for now, as this ad is only to be placed so that Adsense team can check your website. You can change ads settings at any time.
- Get the ad code (for the ad you created in step 10) and place it on your website sidebar: Goto your website dashboard -> Appearance -> Widgets. Select text widget and move it to sidebar -> Paste the ad code in the text widget -> You’re done. NOTE: You won’t be seeing ads as your Adsense account is yet not confirmed/approved but only created.
- Let Adsense team review your website and you’ll listen from them in 3-10 days. You can have active ads (which show ads after you place its code) on your website if your account is approved. If it has not, then you can re-submit your application by login your Adsense account and then after, follow from step 6.
Build and customize Google CSE
Signing up for custom search engine at Google is an easy task. You just need to follow the steps and your CSE engine will be ready to rock at your WordPress blog/site. Webmasters/Bloggers need to set up the search engine correctly and efficiently to suit their website so that you make big profits. If you’re unsure about things, don’t be afraid. I’m going to guide you step-by-step to set up, enhance and customize the Google CSE for your website.
Create Google CSE
- Goto http://www.google.com/cse
- Click ‘Create a Custom Search Engine‘
- Sign in with your Google account.
- You’ll see ‘Setup your search engine‘ page.
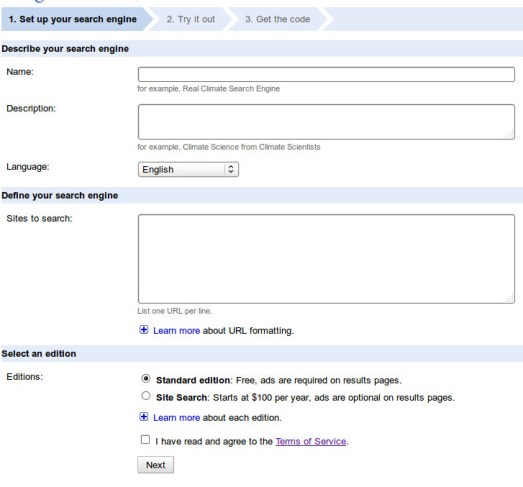
- Give name of your Search engine like ‘Linux Athena Search engine’.
- Give a good description like ‘Linux Athena Search engine indexes LinuxAthena.com and let visitors search for their favorite topics. LinuxAthena is a Linux and free software knowledge base.’
- Choose your CSE language.
- Enter sites that you want your CSE to crawl/search. You can enter multiple URLs, one per line (like I entered LinuxAthena.com and Linux.com in the screenshot). You can enter to search for whole site (like http://linuxathena.com/*), individual pages (like http://linuxathena.com/about/), whole domain (like *.linuxathena.com OR *.linuxathena.com/*) or some parts of the website (like http://linuxathena.com/*linux* will search each url having ‘linux’ as a part).

- Choose CSE edition – Standard/free edition (supported by ads with results) OR Site Search (having starting price $100/year)
- Accept the agreement and click Next.
- Click Next as we’re not ready to change settings at moment.
- Excellent! Your CSE is ready.


Refine your Google CSE settings for Better Profits
- Goto http://www.google.com/cse/manage/all
- Login to your account (if not already logged in).
- You’ll see your CSE (that you created in above steps) in front of you.
- Click on ‘control panel‘ near to it.
- You’ll see ‘Search engine keywords‘ under ‘Basic information‘ – Enter your site keywords in that text box and click on ‘Save changes‘.
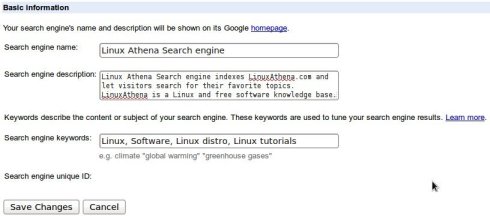
- Scroll down to ‘Search Preferences‘. Choose whether you want search engine to search only included sites or whole Internet. If your site has lots of information and you want your visitors to browse your site only, then choose included sites option else choose Internet option.
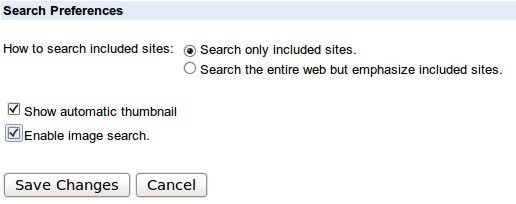
- Check the option ‘Enable Image search‘. Choose this only if your site has some images and all images have well-written title and caption attributes (which are asked in WordPress when you upload an image/picture). Then click on ‘Save changes’.
- If you’ve selected results from whole Internet (and not Included site only), then ONLY follow this step. Click on ‘Sites‘ in the left bar. Click on ‘Exclude sites‘ in right. Enter your competitor websites in this text box. Do this for all of your website competitors. This will make sure that your site don’t give results from your competitors’ websites, else you’ll lose your visitors.
- Choose ‘Indexing‘ on the left and then click ‘URLs linked from a page or Sitemap‘ on the right. Enter your sitemap URL, if you have one else leave this step. PS- If you don’t use sitemap or SEO enhancing plugins (like from Yoast WordPress SEO) on your WordPress, then start using it!
- Choose ‘Promotions‘ on left bar. Promotions are just like ads shown on Google.com results page. You can promote your/others’ products using Promotions in your custom search engine. Check ‘Enable promotions‘ and ‘Show promotions in Autocompletions‘. Click on Add. Enter all the details and don’t forget to check ‘Enabled‘ option and click OK. Add some of your best pages/topics/products here. Queries are words that when searched, will trigger your promotion. Title is your custom title you want to give to your promotion. Link is where your promotion will link to.
- Choose ‘Synonyms‘ in the left bar. Click Add. Enter the details and click OK. Search term is the word/phrase for which you need to give synonyms.
- Choose ‘Autocompletions‘ in the left bar. Click ‘Enable autocompletions‘ option and then click on Save button. Click on Add. Write words that should be autocompleted. You can also give custom ranking to autocompleted words like “ubuntu linux,9” and “ubuntu reviews,8” in two lines will state that if a user is typing “ubuntu” then he will receive two autocompletions, first being “ubuntu linux” (having rank 9) and then “ubuntu reviews” (having rank 8).


Customize the Look/Style of your CSE
- Goto http://www.google.com/cse/manage/all
- Login to your account (if not already logged in).
- You’ll see your CSE (that you created in above steps) in front of you.
- Click on ‘control panel‘ near to it.
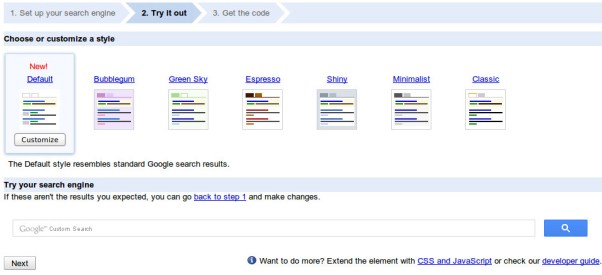
- Choose ‘Look and feel‘ in the left bar.
- At right side, Choose ‘Default‘ under ‘Choose or customize a style‘ (this is the most simple and elegant – the default search bar of Google).
- Though you can choose any other style but it’ll be more typical to customize them.
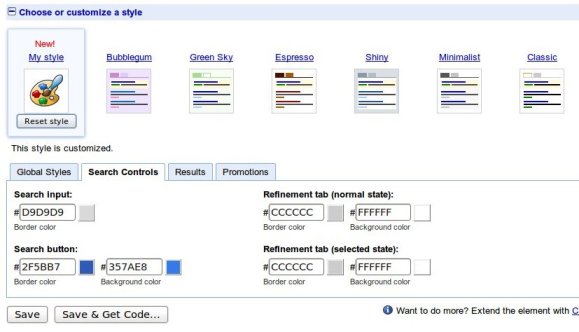
- Now, click ‘Customize‘ button, present on the Default style.
- Goto ‘Search Controls‘ tab in customize options shown.
- Change Search button background and border colors with something like your site theme color. For example, if my site have Black as theme color, then I’ll choose shaded black for background color and dark black for border color. This is the easiest way to suite your newly made CSE with your website theme/template.
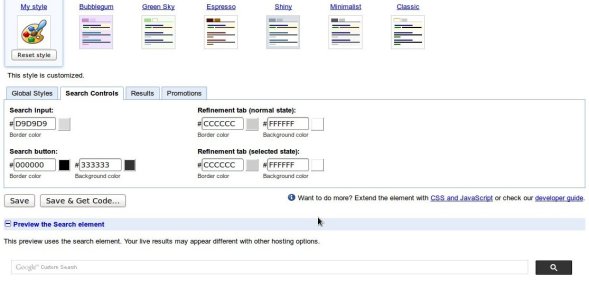
- I’ll say this is the end to customization but if you want, you can also play with other two tabs – ‘Results‘ and ‘Promotions‘ in same way as ‘Search Controls’ and change the colors, but their default options are good for most of the sites/themes.
- You can see the preview of your CSE under Preview option. Search using a word in that preview box and you’ll also be able to see how your search results and promotions will be shown. This will help you to better customize them.
- Ater you stop customizing your CSE, click on ‘Save‘ button.


Customize the Layout of your CSE
Layout serve different purposes and not only looks. Layout is not set up to change how your CSE looks but where and how it will be placed and it will work. Layout is to ask your CSE to show results on whole page or part of page or on new page and to ask where the CSE search bar will be placed. You can choose any layout out of the given six. But, their implementation in WordPress is little different, so, I’ll be explaining how to make some of them, so that you can choose the layout what you like.
Add Google CSE to your site
Implementing Full-width/Compact/Results-only/Google-hosted layouts
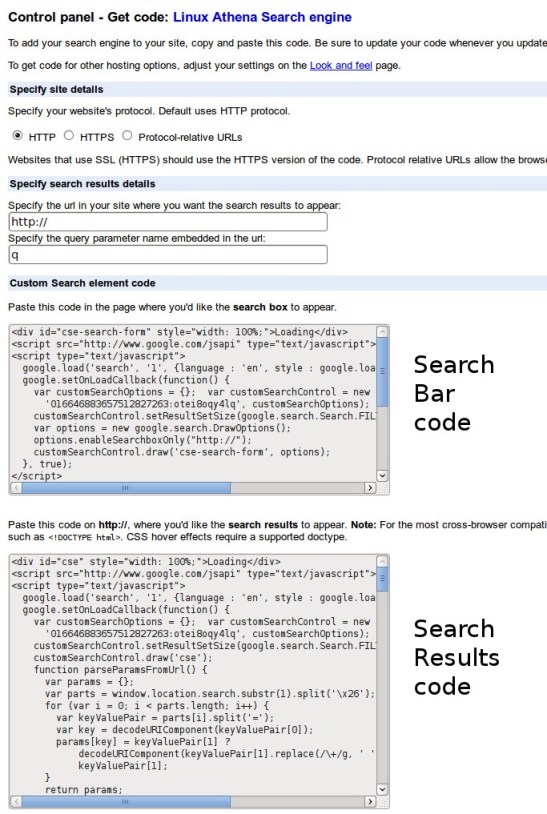
- Choose your layout and click ‘Save and get code‘ button.
- Choose your site protocol: HTTP or HTTPS or Protocol-relative URLs.
- Now, login to your website dashboard without closing Google CSE page.
- Goto Appearance -> Widgets.
- Select a text widget and move it to sidebar (primary or footer widget) by holding it.
- Browse back to Google CSE page and copy the contents of the box (labelled as ‘Search Bar code’ in given screenshot).
- Go again to your website dashboard page and paste this content (that you copied in last step) in the text widget (you created in second last step).
- Click on Save button of the text widget and then close that widget.
- That’s it. Your CSE is ready!
Implementing Two-page layout
- Choose Two-page layout and click ‘Save and get code‘ button.
- Choose your site protocol: HTTP or HTTPS or Protocol-relative URLs.
- Under ‘Specify search results details‘, enter the page URL where you want your search results to appear. If you’re willing to create a page with ‘sitesearch’ as slug/URL-name, then enter ‘/sitesearch/’ in this textbox like ‘http://linuxathena.com/sitesearch/’. We’ll create/setup this page later, but you should be sure about the page name or slug for now only, else your CSE won’t work. Write down this page name somewhere as we’ll be needing this name in future steps.
- Now, login to your website dashboard without closing Google CSE page.
- Goto Appearance -> Widgets.
- Select a text widget and move it to sidebar (primary or footer widget) by holding it.
- Browse back to Google CSE page and copy the contents of first box (labelled as ‘Search Bar code’ in given screenshot).
- Go again to your website dashboard page and paste this content (that you copied in last step) in the text widget (you created in second last step).
- Click on Save button of the text widget and then close that widget.
- Complete the template creation wizard.
- Goto Pages -> Add New.
- Give the name of your page as you wish.
- Enter the slug of your page as ‘sitesearch‘ (or whatever you kept in above steps.)
- On the right center-most of the screen, you’ll see an option named ‘Template‘. Choose ‘Google Search page‘ from the drop down menu.
- Don’t enter anything as page content, i.e., don’t write anything on page.
- Enter any SEO settings you have to enter.
- Save the page.
- That’s it! Your CSE for double-page layout is ready.

Page Template creation wizard
NOTE: Please take care while following these steps. Your single mistake can lead your site not to work properly.
- Create a new file named page-template-search.php and paste this below given content into this file and then save it. Please make sure that you don’t insert even a one extra space in this file, except the content I’m telling to copy in this file.
<!–?–>php
/**
* Template Name: Google Search page
*/global $theme; get_header(); ?>
<div id=”main”>
<!–?–>php $theme->hook(‘main_before’); ?>
<div id=”content”>
<!–?–>php $theme->hook(‘content_before’); ?>
/* Paste your Search Results code below this line. */
/* Paste your Search Results code above this line. */
<!–?–>php $theme->hook(‘content_after’); ?>
</div><!– #content –>
<!–?–>php get_sidebars(); ?>
<!–?–>php $theme->hook(‘main_after’); ?>
</div><!– #main –>
<!–?–>php get_footer(); ?>
- Now, open that Google CSE page again.
- Copy the code given in second box (labelled as ‘Search Results code’ in given screenshot).
- Now, open that file we created in last steps (page-template-search.php).
- Paste the code between the lines saying ‘Paste your Search Results code below this line.’ and ‘Paste your Search Results code above this line.’
- Save and close the file.
- Now, your file should look somewhat like this:
<!–?–>php
/**
* Template Name: Google Search page
*/global $theme; get_header(); ?>
<div id=”main”>
<!–?–>php $theme->hook(‘main_before’); ?>
<div id=”content”>
<!–?–>php $theme->hook(‘content_before’); ?>
/* Paste your Search Results code below this line. */
<div id=”cse” style=”width: 100%;”>Loading</div>
// =”http://www.google.com/jsapi” type=”text/javascript”>
// ]]>
<script type=”text/javascript”>
google.load(‘search’, ‘1’, {language : ‘en’, style : google.loader.themes.V2_DEFAULT});
google.setOnLoadCallback(function() {
var customSearchOptions = {}; var customSearchControl = new google.search.CustomSearchControl(
‘blank-blank-blank-blank-blank’, customSearchOptions);
customSearchControl.setResultSetSize(google.search.Search.FILTERED_CSE_RESULTSET);
customSearchControl.draw(‘cse’);
function parseParamsFromUrl() {
var params = {};
var parts = window.location.search.substr(1).split(‘x26’);
for (var i = 0; i < parts.length; i++) {
var keyValuePair = parts[i].split(‘=’);
var key = decodeURIComponent(keyValuePair[0]);
params[key] = keyValuePair[1] ?
decodeURIComponent(keyValuePair[1].replace(/+/g, ‘ ‘)) :
keyValuePair[1];
}
return params;
}var urlParams = parseParamsFromUrl();
var queryParamName = “q”;
if (urlParams[queryParamName]) {
customSearchControl.execute(urlParams[queryParamName]);
}
}, true);
</script><style type=”text/css”>
.gsc-control-cse {
font-family: Arial, sans-serif;
border-color: #FFFFFF;
background-color: #FFFFFF;
}
.gsc-control-cse .gsc-table-result {
font-family: Arial, sans-serif;
}
input.gsc-input, .gsc-input-box, .gsc-input-box-hover, .gsc-input-box-focus {
border-color: #D9D9D9;
}
input.gsc-search-button, input.gsc-search-button:hover, input.gsc-search-button:focus {
border-color: #000000;
background-color: #333333;
background-image: none;
filter: none;
}
.gsc-tabHeader.gsc-tabhInactive {
border-color: #CCCCCC;
background-color: #FFFFFF;
}
.gsc-tabHeader.gsc-tabhActive {
border-color: #CCCCCC;
border-bottom-color: #FFFFFF;
background-color: #FFFFFF;
}
.gsc-tabsArea {
border-color: #CCCCCC;
}
.gsc-webResult.gsc-result,
.gsc-results .gsc-imageResult {
border-color: #FFFFFF;
background-color: #FFFFFF;
}
.gsc-webResult.gsc-result:hover,
.gsc-imageResult:hover {
border-color: #FFFFFF;
background-color: #FFFFFF;
}
.gs-webResult.gs-result a.gs-title:link,
.gs-webResult.gs-result a.gs-title:link b,
.gs-imageResult a.gs-title:link,
.gs-imageResult a.gs-title:link b {
color: #1155CC;
}
.gs-webResult.gs-result a.gs-title:visited,
.gs-webResult.gs-result a.gs-title:visited b,
.gs-imageResult a.gs-title:visited,
.gs-imageResult a.gs-title:visited b {
color: #1155CC;
}
.gs-webResult.gs-result a.gs-title:hover,
.gs-webResult.gs-result a.gs-title:hover b,
.gs-imageResult a.gs-title:hover,
.gs-imageResult a.gs-title:hover b {
color: #1155CC;
}
.gs-webResult.gs-result a.gs-title:active,
.gs-webResult.gs-result a.gs-title:active b,
.gs-imageResult a.gs-title:active,
.gs-imageResult a.gs-title:active b {
color: #1155CC;
}
.gsc-cursor-page {
color: #1155CC;
}
a.gsc-trailing-more-results:link {
color: #1155CC;
}
.gs-webResult .gs-snippet,
.gs-imageResult .gs-snippet,
.gs-fileFormatType {
color: #333333;
}
.gs-webResult div.gs-visibleUrl,
.gs-imageResult div.gs-visibleUrl {
color: #009933;
}
.gs-webResult div.gs-visibleUrl-short {
color: #009933;
}
.gs-webResult div.gs-visibleUrl-short {
display: none;
}
.gs-webResult div.gs-visibleUrl-long {
display: block;
}
.gs-promotion div.gs-visibleUrl-short {
display: none;
}
.gs-promotion div.gs-visibleUrl-long {
display: block;
}
.gsc-cursor-box {
border-color: #FFFFFF;
}
.gsc-results .gsc-cursor-box .gsc-cursor-page {
border-color: #CCCCCC;
background-color: #FFFFFF;
color: #1155CC;
}
.gsc-results .gsc-cursor-box .gsc-cursor-current-page {
border-color: #CCCCCC;
background-color: #FFFFFF;
color: #1155CC;
}
.gsc-webResult.gsc-result.gsc-promotion {
border-color: #F6F6F6;
background-color: #F6F6F6;
}
.gsc-completion-title {
color: #1155CC;
}
.gsc-completion-snippet {
color: #333333;
}
.gs-promotion a.gs-title:link,
.gs-promotion a.gs-title:link *,
.gs-promotion .gs-snippet a:link {
color: #1155CC;
}
.gs-promotion a.gs-title:visited,
.gs-promotion a.gs-title:visited *,
.gs-promotion .gs-snippet a:visited {
color: #1155CC;
}
.gs-promotion a.gs-title:hover,
.gs-promotion a.gs-title:hover *,
.gs-promotion .gs-snippet a:hover {
color: #1155CC;
}
.gs-promotion a.gs-title:active,
.gs-promotion a.gs-title:active *,
.gs-promotion .gs-snippet a:active {
color: #1155CC;
}
.gs-promotion .gs-snippet,
.gs-promotion .gs-title .gs-promotion-title-right,
.gs-promotion .gs-title .gs-promotion-title-right * {
color: #333333;
}
.gs-promotion .gs-visibleUrl,
.gs-promotion .gs-visibleUrl-short {
color: #009933;
}</style>/* Paste your Search Results code above this line. */
<!–?–>php $theme->hook(‘content_after’); ?>
</div><!– #content –>
<!–?–>php get_sidebars(); ?>
<?php $theme->hook(‘main_after’); ?>
</div><!– #main –>
<?php get_footer(); ?>
- Login to your web hosting account.
- Open File manager.
- Goto the folder where you installed WordPress.
- Open wp-content directory. NOTE: It can have a different name for you, if you changed it for enhancing security.
- Open themes directory.
- Open your-site-theme directory. You must know which theme your site uses and open that directory.
- Upload the file we created in above steps (page-template-search.php) to this folder.
- Close file manager and logout from your web hosting account.
Join Adsense account with your CSE
- Goto http://www.google.com/cse/manage/all
- Login to your account if not already logged in.
- You’ll see your CSE (that you created in above steps) in front of you.
- Click on ‘control panel‘ near to it.
- Choose ‘Make money‘ in the left side bar.
- Select ‘I already have an Adsense account‘. Enter the details of your Adsense account and hit Save button. NOTE: If you don’t have an Adsense account, then don’t sign up using this page – instead, follow these steps.
- Check ‘Allow ads at the top of the page‘ option and click ‘Save Ads Layout‘ button. Checking this option will help maximize your revenue.
Completing all the steps in accordance to procedure stated above, you must have set up the CSE and Adsense till now. I know it was a lengthy job but hard work* is the key to success. Now, your website will have a search engine. Google CSE is better than WordPress back-end search engine. And also, you attached your CSE to Google Adsense, which will start making you money as people start searching your website. This way, you’re having double profits: a better search engine for your website + making money from that search engine.
Best wishes for your success
You’ve successfully completed the tutorial. I wish you for your success in making money through your website. Write new and quality content – people will surely like your website.
I’ve tried my best to make this tutorial as simple as possible. Please don’t hesitate to ask anything or report an error or discuss this tutorial via comments (below).
*Latest version: Smart work is they key to success.


