Are you like most people, who first created their site on Weebly because it’s the easiest to use and it’s free? But once you get more into blogging, you might want your website to be more customizable and have more control over your website.
After doing some research, you may realize that moving it to WordPress is your best option but now you have no idea how to migrate it.
Don’t worry, this article is going to guide you through the whole process of transferring your Weebly site to a WordPress site step by step, so you can get up and running quickly.
Let’s get started!
Step 1: Setting up Hosting

To start a WordPress site, first you need a hosting account.
A hosting account is what every webmasters need to have and it’s basically your house on the web. It stores all of your website file, images that you have on your site and everything.
With so many different hosting providers and plans to choose from, it can be frustrating to find one that’s right for you and your site.

Fortunately, WordPress hosting doesn’t have to be a headache. As long as you know what’s the need of your site, and what a great hosting plan should provide, it won’t be difficult to sort through the available options and narrow them down.
Are you still confused? Then refer to this beginner’s guide to WordPress hosting to find out what’s your ideal hosting plan.
Step 2: Setting up Domain Name
A domain name (or you call it website name) is the address where Internet users can access your website (e.g. www.example.com).
While WordPress itself is free, you still have to pay for both web hosting and domain. However, you can get FREE lifetime domain when you sign up any hosting plan with WPWebHost.
If you’re using the free version of Weebly, you probably want to get rid of the “.weebly.com” from your URL. In fact, you have no choice but to purchase a new domain if you are migrating from Weebly. Besides, the registration price of custom domain name on Weebly is staggeringly high (ranging from $24.99 to $39.95 per year).
And, why do you pay for your domain when you can get it for free?
Moreover, getting a domain name from your web hosting company is a lot more convenient. In most cases, the company is going to take care of connecting the domain name and hosting for you, meaning you’ll have everything configured right out of the box.
Step 3: Installing WordPress
You may skip this step if you’re hosting with WPWebHost as we provide pre-installed WordPress in the hosting, so once you complete the purchase, everything is ready to go!
Or else, you’ll need to install WordPress manually from your control panel.

This process is incredibly easy, with just a few clicks and you’re done.
First, log in to your hosting account, go to your control panel/dashboard and find the “Install WordPress” button and run the installation. Go through some simple procedure, wait for the progress bar to finish and Voilà!
Step 4: Importing Content from Weebly
In this step, you’ll need a tool– Weebly to WordPress Importer. It’s a free online tool that helps to import and converts your Weebly content into WordPress compatible import format.
First, go to Weebly to WordPress Importer website and fill up the details.
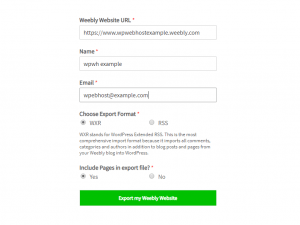
The export format will be WXR format, and you shouldn’t change that unless you run into an issue later.
Include Pages in export file? The default answer is “Yes”, unless you really don’t want to export your Weebly pages.
Finally, click on ‘Export my Weebly Website’ and wait for your export file to be generated. Next, download the export.xml file to your computer.
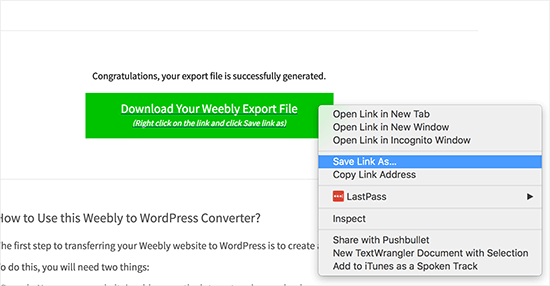
After that, it’s time to import it into WordPress. Login to your admin panel » Tools » Import, you’ll see WordPress at the bottom of the page, click ‘Install Now’. Once it is installed, click ‘Run Importer’ to launch it.
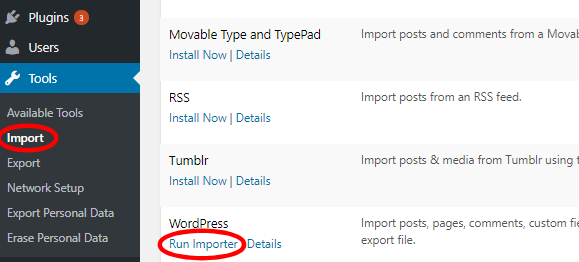
Then, you’ll be directed to WordPress importer page and here you upload the export.xml file you downloaded earlier.
You’ll be asked to assign authors on the next screen as below. Oh, and remember to check the ‘‘Download and import file attachments’ option.
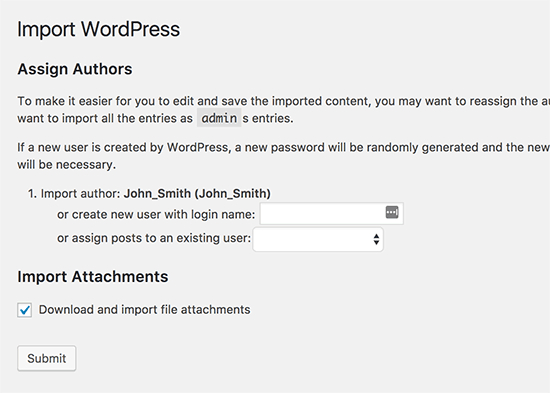
After submitting, your export file will now be imported to your WordPress database. And… that’s all! You have successfully transfer your Weebly site to WordPress. Now, go to your admin area to check if your content is there. Also check the media library to see the images imported from your Weebly site.
Step 5: Setting up Redirects
In this step, you have to set up redirects based on your type of domain name. Refer to procedure 1 if you were using custom domain (i.e. www.yoursite.com) or refer to procedure 2 if you were using a subdomain on your Weebly site (i.e. www.yoursite.weebly.com).
Procedure 1: Custom Domain
First, login to your Weebly account » Domains page » your domain name, then click on the change button next to nameservers option.
On the next screen, you need to key in your new WordPress host’s nameservers. For WPWebHost, enter as below
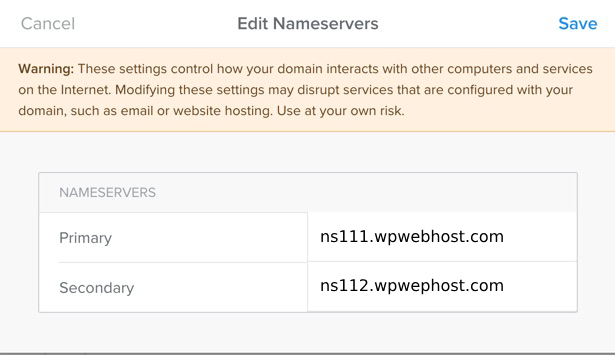
And don’t forget to save your settings! It may take some time to take effect.
Procedure 2: Subdomain
First, login to your dashboard » Edit site » Settings » SEO and paste this code <meta http-equiv=”refresh” content=”0;url=http://www.yourdomain.com/“> on your Header Code (replace yourdomain.com with your new domain).
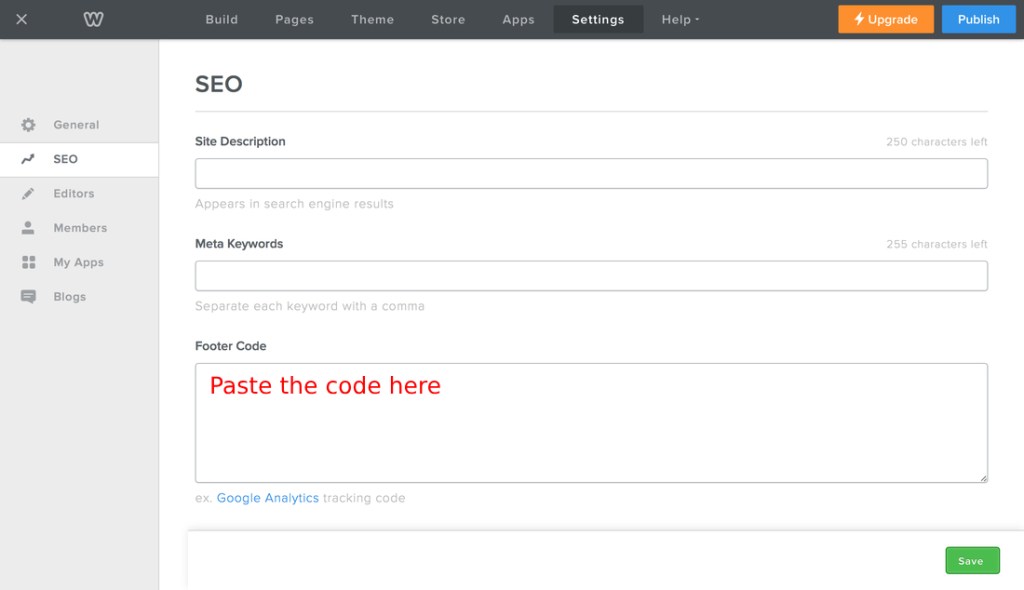
Click on save and publish and you’re all done. Now, you can go to your Weebly site, and it will redirect to your WordPress site.
Step 6: Setting up Permalinks
“The permalink is the full URL you see – and use – for any given post, page or other pieces of content on your site. It’s a permanent link, hence the name permalink.” -Yoast
The URL structure for blog posts and pages on your Weebly site may be different. For example: www/example.com/page-title.html (pages), www.example.com/blog/your-post-title/ (blog post).
Hence, you need to redirect your users to the right post if you were using a custom domain on your Weebly site, if not users will see error message if they visit a post on your old Weebly site.
Here’s how! First, go to Settings » Permalinks page » Custom structure, then add in /blog/%postname% to the field, like this
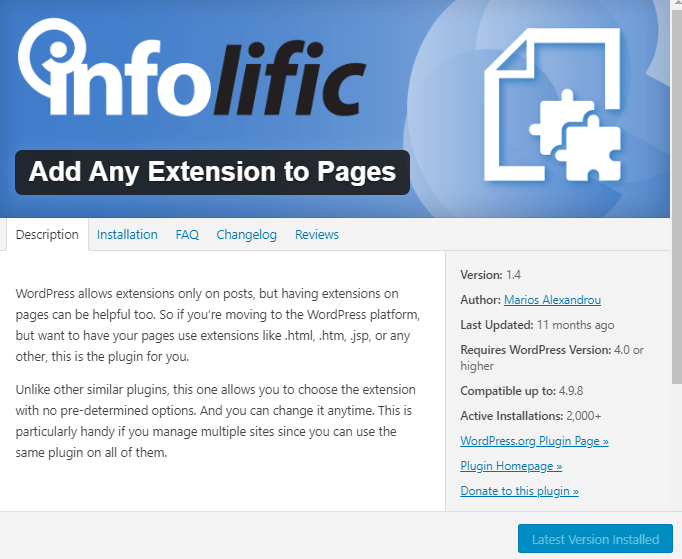
Then, save changes to update your permalinks. Next, install and activate a plugin named “Add Any Extension to Pages”. Upon activation, go to Settings » Add Any Extension to Pages and enter .html in the field.
After updating your settings, don’t forget to click on the save changes button in Permalinks pages to update your permalink structure.
Step 7: Choose a New Theme
Finally, we’ve come to the last step which is choosing a new theme for your site. Your WordPress site would come with this default theme.
But don’t worry, you can always change the theme to your liking.
All you need to do is login to your dashboard » Appearance » Themes » Add New and you will see all the themes available. Go ahead and make your choice, you can preview as many as you want before you find the perfect one just for your site!
After you go through this guide, it shouldn’t be a trouble for you to transfer to WordPress site.
If you have any question, please comment below.
