As you might already familiar, most database-related tasks for WordPress is using phpMyAdmin, a GUI solution for managing MySQL databases. In this tutorial, you will learn how to manage your WordPress database using MySQL command line method.
To use this tutorial, it is required that:
1.) You have secure shell (SSH) enabled in your server. You should have your SSH username, password, port number and its hostname. If you don’t know these things, you need to contact your web host.
2.) You already have a working WordPress database with its username, password and hostname.
You will be connecting to your WordPress MySQL server via SSH (secure shell).
Connect first to your SSH server
The first step is to connect to an SSH server before connecting to WordPress MySQL database. This is a secure method since SSH will encrypt your MySQL sessions as it travels over the Internet.
For Windows OS users:
1.) Download the tools. For 32-bit Windows:
Download putty.exe here.
Download pscp.exe here.
For 64-bit Windows:
https://splunk.net/w/PuTTy64bit/
Click only the link for putty.exe and pscp.exe to download.
2.) In your Windows desktop, create a folder named as ssh. Put pscp.exe and putty.exe inside that folder.
As a background, putty.exe is your ssh client that you will be using in connecting to your SSH and MySQL server. You can browse the files in your server as well as interact with your WordPress database. Pscp.exe is only used in transferring files from and to your server. You can use this when doing WordPress database backups.
3.) Go to Start – Run, then type CMD. This will bring you to the command prompt. Navigate to your ssh folder containing putty.exe. Enter this command:
cd Desktop/ssh
4.) Finally initiate connections to your SSH server. These are NOT yet your WordPress MySQL server. Enter this command in the DOS prompt:
putty.exe -ssh sshusername@sshhostname.com -P [portnumber]
Supposing you have the following SSH login credentials:
ssh username: codex
ssh hostname: codexwebsite.com
ssh port number: 22
The command to type will be:
putty.exe -ssh codex@codexwebsite.com -P 22
For Linux OS users:
a.) Simply press Control Alt – T to launch the terminal command prompt. You don’t need to use pUTTY.
b.) Connect to your remote SSH server using (take note that p is now in small case):
ssh sshusername@sshhostname.com -p [portnumber]
For both Linux/Windows users:
You will see a warning (only appear for the first time you connect to a remote SSH server) asking whether to trust the host, simply click YES to proceed.
For Windows users:
pUTTY will ask for a password. Simply copy your password( from Keepas or other password management software you are using) and left click on the blinking mouse cursor. It will turn to solid green.
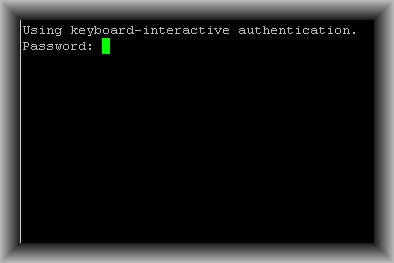
Then to paste the password, press your mouse RIGHT CLICK button directly over the solid green cursor. You will not see the password as it is hidden for security reasons but it will be pasted automatically. Take note that Control – V does not work with puTTY.
After right clicking, press enter key to authenticate. If there is no password errors; you should see the bash prompt of your SSH server, for example:
codex@codexwebsite.com [~]#
Or in some servers, it might look like this:
-bash-3.2$
If you see this, you are successfully connected to your SSH server.
For Linux OS users: To paste the password, go to Edit – Paste (this is found in the terminal.)
Connecting to your WordPress database
Now you are connected to your SSH server, you can connect to your WordPress database using this command:
mysql -uWORDPRESS_MYSQL_USERNAME -pWORDPRESS_MYSQL_PASSWORD -hWORDPRESS_MYSQL_HOSTNAME
You can also locate these details in your wp-config.php. Example, supposing you have the following MySQL login credentials:
WordPress MySQL username: codex
WordPress MYSQL password: mypasswordxxx
WordPress MySQL hostname: localhost
The command to connect to the MySQL server will be:
mysql -ucodex -pmypasswordxxx -hlocalhost
To copy/paste the WordPress MySQL username, password and hostname from your password manager(or wherever they are saved) to pUTTY, simply mouse over the green cursor and right click it to paste. You will see the values after pasting it.
Press enter and then you will then see the MySQL prompt, such as shown below:
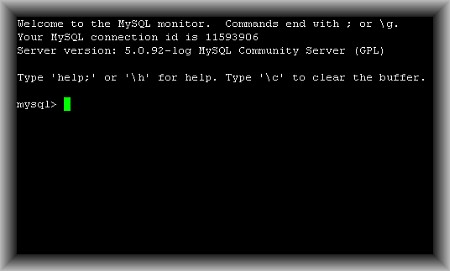
You have successfully connected to your WordPress database.
Accessing the WordPress database and its data
Follow the drills below to get started with accessing your WordPress database in the command line mode:
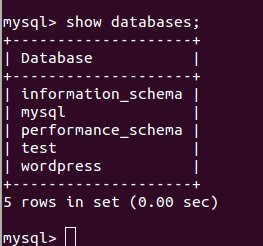
1.) Display all databases:
show databases;
Find the name of your WordPress database, for example in the screenshot below it is named as “Wordpress”. If you are not sure which of those is the one used by WordPress, you can get the database name by looking at wp-config.php.
If you have root access to your MySQL, you can even create your WordPress database using command line method before installing WordPress in your server:
create database DESIRED_WORDPRESS_DATABASE_NAME;
However most web hosts won’t grant this type of privilege unless you are on a dedicated or VPS server. Since most of WordPress webmasters are on a shared server, they will be using cPanel to create the database and not on a command line mode.
2.) Now you know the WordPress database name, you can access it by typing the command below. Make sure all MySQL commands will end with a semicolon (;) before pressing the enter key to execute it.
use wordpress;
If the WordPress database name is MyDatabaseXXX, the command will be:
use MyDatabaseXXX;
3.) Since you are now inside the WordPress database, you can display all tables by entering this command:
show tables;
You should be able to see the WordPress tables such as wp_posts, wp_users, etc.
4.) Display all data in a specific WordPress table:
select * from WORDPRESS_TABLE_NAME;
For example, the query below will display all the WordPress users:
select * from wp_users;
If you find that the results are difficult to read, you can display the results in vertical format by appending G at the last of the command, e.g. (no need to place the semicolon):
select * from wp_usersG
5.) Change password of WordPress user “admin”:
UPDATE wp_users SET user_pass=md5('enter new password here') WHERE user_login='admin';
6.) Delete all spam comments:
DELETE FROM `wp_comments` WHERE `comment_approved`='spam'
Of course, there are still lots of commands for managing WordPress database that is beyond the scope of this article. It will include hopefully in the future tutorials. For the meantime, you need to master the basic MySQL task such as selecting, updating or deleting data.
Be careful when issuing commands and make sure you always have full backups of your MySQL database that you can restore in case of accidental deletion, etc.
Backup MySQL database and download to your Desktop
To back up a database using a command line, you need to logout from your existing MySQL session:
exit;
This will take you back to the SSH bash prompt in your server.
1.) Get the current path that you are in now. You will save the WordPress database temporarily in this path:
pwd
2.) Issue the command to back up the database:
mysqldump -uWORDPRESS_MYSQL_USERNAME -pWORDPRESS_MYSQL_PASSWORD -hWORDPRESS_MYSQL_HOSTNAME WORDPRESS_DATABASE_NAME >/your/current/path/databasename.sql
Example usage:
mysqldump -ucodex -pmypassword -hlocalhost wordpress >/home/codex-m/wordpress.sql
3.) Exit your SSH session:
exit
4.) Back to your Windows computer, go to your Desktop and access the ssh folder in the DOS prompt. Make sure you are inside the SSH folder (which contains pscp.exe) you have created in the first section. Confirm by typing:
chdir
It should return like:
C:UsersYourWindowsUsernameDesktopssh
Download the WordPress database from your remote SSH server to your local Windows computer desktop using pscp.exe:
pscp sshusername@sshhostname.com:/path/where/WordpressDB/is/saved/wordpress.sql C:UsersYourWindowsUsernameDesktop
You will then be ask to enter your SSH password. After authentication the WordPress database will be dowloaded to your Desktop.
In Linux terminal, the command is scp instead of pscp, for example:
scp sshusername@sshhostname.com/path/WordpressdB/wordpress.sql /home/your_username/Desktop